


Chapitre 19 : Annexes▲
19.1. Installation de Python▲
Si vous souhaitez essayer Python sur votre ordinateur personnel, n'hésitez pas : l'installation est trčs facile (et parfaitement réversible).
19.2. Sous Windows▲
Sur le site web officiel de Python : http://www.python.org , vous trouverez dans la section
« Download » des logiciels d'installation automatique pour les différentes versions de Python. Vous
pouvez en confiance choisir la derničre version « de production ».
Par exemple, au 30/9/03, il s'agit de la version 2.3.1 - Fichier ŕ télécharger : Python-2.3.1.exe
Copiez ce fichier dans un répertoire temporaire de votre machine, et exécutez-le. Python
s'installera par défaut dans un répertoire nommé « Python** » (** indiquant les deux premiers
chiffres du n° de version), et des icônes de lancement seront mises en place automatiquement.
Lorsque l'installation est terminée, vous pouvez effacer le contenu du répertoire temporaire.
19.3. Sous Linux▲
Vous avez probablement installé votre systčme Linux ŕ l'aide d'une distribution commerciale telle que SuSE, RedHat ou Mandrake. Installez simplement les paquetages Python qui en font partie, en n'omettant pas Tkinter (parfois installé en męme temps que la Python imaging library).
19.4. Sous MacOS▲
Vous trouverez différentes versions de Python pour MacOS 9 et Mac OS X sur le site web de
Jack Jansen : http://homepages.cwi.nl/~jack/macpython
Remarque importante concernant les versions récentes de Python
Depuis l'apparition de la version 2.3, il est vivement recommandé aux francophones que nous
sommes d'inclure l'un des pseudo-commentaires suivant au début de tous nos scripts Python (ŕ la 1e
ou 2e ligne) :
# -*- coding:Latin-1 -*-
Ou bien :
# -*- coding:Utf-8 -*-
Vous trouverez l'explication de cette nécessité ŕ la page 40.
19.5. Installation de SciTE (Scintilla Text Editor)▲
SciTE est un excellent logiciel éditeur, capable d'effectuer la coloration syntaxique, l'autocomplétion
et surtout le repliement de code (code folding), c'est ŕ dire le masquage ŕ volonté de
différents blocs d'instructions (contenu d'une classe, d'une fonction, d'une boucle, etc.) : cette
fonctionnalité se révčle extręmement pratique lorsque vos scripts commencent ŕ s'allonger ... Il
intčgre également une fenętre de terminal ainsi qu'un raccourci pour lancement des scripts.
Cet éditeur est disponible pour Windows et pour Linux.
Veuillez consulter le site web : http://www.scintilla.org/SciTE.html
19.5.1. Installation sous Linux :▲
L'éditeur Scintilla fait dorénavant partie des paquetages fournis d'office avec les distributions récentes de Linux. Sinon, téléchargez-le au départ du site web mentionné ci-dessus. Ensuite :
- Télécharger l'archive gscite***.tgz puis l'extraire avec tar.
- Installer l'exécutable SciTE dans /usr/local/bin
- Installer tout le reste (fichiers *.properties) dans /usr/share/scite (et non /usr/share/gscite !)
19.5.2. Installation sous Windows :▲
- Télécharger l'archive wscite***.zip puis l'extraire dans \Program files
- Installer une icône de lancement pour l'exécutable SciTe.exe
19.5.3. Pour les deux versions :▲
On peut personnaliser beaucoup de choses (polices, etc.) en editant le fichier des proprietes
globales (Menu Options → Open global options file)
Par exemple, pour activer de jolis symboles pour replier/deplier, dans la marge de gauche :
fold.symbols = 2           # pour de belles icônes + et - cerclées
fold.on.open = 1           # ainsi tout est plié au départ
margin.width =0            # pour supprimer la marge inutile
Pour forcer le remplacement automatique des tabulations par des groupes de 4 espaces :
tabsize = 4
indent.size = 4
use.tabs = 0
19.6. Installation des Python méga-widgets▲
Visitez le site web : http://pmw.sourceforge.net
et cliquez sur le lien : Download Pmw12tar.gz pour télécharger le fichier correspondant.
Décomprimez ce fichier archive dans un répertoire temporaire, ŕ l'aide d'un logiciel de
décompression tel que tar, Winzip, Info-Zip, unzip ....
Recopiez l'intégralité du sous-répertoire Pmw qui s'est créé automatiquement, dans le répertoire
oů se trouve déjŕ l'essentiel de votre installation de Python.
Sous Windows, il s'agira par exemple de C:\Python23
Sous Linux, il s'agira vraisemblablement de /usr/lib/python
19.7. Installation de Gadfly (systčme de bases de données)▲
Depuis le site http://sourceforge.net/projects/gadfly, télécharger le paquetage gadfly-1.0.0.tar.gz Il s'agit d'un fichier archive comprimé. Copiez ce fichier dans un répertoire temporaire.
19.7.1. Sous Windows :▲
Dans un répertoire temporaire quelconque, décomprimez le fichier archive ŕ l'aide d'un logiciel
tel que Winzip.
Ouvrez une fenętre DOS et entrez dans le sous-répertoire qui s'est créé automatiquement.
Lancez la commande : python setup.py install C'est tout.
Vous pouvez éventuellement améliorer les performances, en ajoutant l'opération suivante :
Dans le sous-répertoire qui s'est créé, ouvrez le sous-répertoire kjbuckets, puis le sous-répertoire
qui correspond ŕ votre version de Python. Recopiez le fichier *.pyd qui s'y trouve dans le répertoire
racine de votre installation de Python.
Lorsque tout est terminé, effacez le contenu de votre répertoire temporaire.
19.7.2. Sous Linux :▲
En tant qu'administrateur (root), choisissez un répertoire temporaire quelconque et
décomprimez-y le fichier archive ŕ l'aide de l'utilitaire tar, qui fait certainement partie de votre
distribution. Entrez simplement la commande : tar -xvzf gadfly-1.0.0.tar.gz
Entrez dans le sous-répertoire qui s'est créé automatiquement : cd gadfly-1.0.0
Lancez la commande : python setup.py install C'est tout.
Si votre systčme Linux comporte un compilateur C, vous pouvez améliorer les performances de
Gadfly en recompilant la bibliothčque kjbuckets. Pour ce faire, entrez encore les deux commandes
suivantes :
cd kjbuckets
python setup.py install
Lorsque tout est terminé, effacez tout le contenu du répertoire temporaire.
19.9. Solutions aux exercices▲
Pour quelques exercices, nous ne fournissons pas de solution. Efforcez-vous de les trouver sans
aide, męme si cela vous semble difficile. C'est en effet en vous acharnant sur de tels problčmes que
vous apprendrez le mieux.
Exercice 4.2 :
>>> c = 0
>>> while c < 20:
...     c = c +1
...     print c, "x 7 =", c*7
ou encore :
>>> c = 1
>>> while c <= 20:
...     print c, "x 7 =", c*7
...     c = c +1
Exercice 4.3 :
>>> s = 1
>>> while s <= 16384:
...     print s, "euro(s) =", s *1.65, "dollar(s)"
...     s = s *2
Exercice 4.4 :
>>> a, c = 1, 1
>>> while c < 13:
...     print a,
...     a, c = a *3, c+1
Exercice 4.6 :
# Le nombre de secondes est fourni au départ :
# (un grand nombre s'impose !)
nsd = 12345678912
# Nombre de secondes dans une journée :
nspj = 3600 * 24
# Nombre de secondes dans un an (soit 365 jours -
# on ne tiendra pas compte des années bissextiles) :
nspa = nspj * 365
# Nombre de secondes dans un mois (en admettant
# pour chaque mois une durée identique de 30 jours) :
nspm = nspj * 30
# Nombre d'années contenues dans la durée fournie :
na = nsd / nspa # division <entičre>
nsr = nsd % nspa # n. de sec. restantes
# Nombre de mois restants :
nmo = nsr / nspm # division <entičre>
nsr = nsr % nspm # n. de sec. restantes
# Nombre de jours restants :
nj = nsr / nspj # division <entičre>
nsr = nsr % nspj # n. de sec. restantes
# Nombre d'heures restantes :
nh = nsr / 3600 # division <entičre>
nsr = nsr % 3600 # n. de sec. restantes
# Nombre de minutes restantes :
nmi = nsr /60 # division <entičre>
nsr = nsr % 60 # n. de sec. restantes
print "Nombre de secondes ŕ convertir :", nsd
print "Cette durée correspond ŕ", na, "années de 365 jours, plus"
print nmo, "mois de 30 jours,",
print nj, "jours,",
print nh, "heures,",
print nmi, "minutes et",
print nsr, "secondes."
Exercice 4.7 :
# affichage des 20 premiers termes de la table par 7,
# avec signalement des multiples de 3 :
i = 1 # compteur : prendra successivement les valeurs de 1 ŕ 20
while i < 21:
# calcul du terme ŕ afficher :
t = i * 7
# affichage sans saut ŕ la ligne (utilisation de la virgule) :
print t,
# ce terme est-il un multiple de 3 ? (utilisation de l'opérateur modulo) :
if t % 3 == 0:
print "*", # affichage d'une astérisque dans ce cas
i = i + 1 # incrémentation du compteur dans tous les cas
Exercice 5.1 :
# Conversion degrés -> radians
# Rappel : un angle de 1 radian est un angle qui correspond ŕ une portion
# de circonférence de longueur égale ŕ celle du rayon.
# Puisque la circonférence vaut 2 pi R, un angle de 1 radian correspond
# ŕ 360° / 2 pi , ou encore ŕ 180° / pi
# Angle fourni au départ en degrés, minutes, secondes :
deg, min, sec = 32, 13, 49
# Conversion des secondes en une fraction de minute :
# (le point décimal force la conversion du résultat en un nombre réel)
fm = sec/60.
# Conversion des minutes en une fraction de degré :
fd = (min + fm)/60
# Valeur de l'angle en degrés "décimalisés" :
ang = deg + fd
# Valeur de pi :
pi = 3.14159265359
# Valeur d'un radian en degrés :
rad = 180 / pi
# Conversion de l'angle en radians :
arad = ang / rad
# Affichage :
print deg, "°", min, "'", sec, '" =', arad, "radian(s)"
Exercice 5.3 :
# Conversion °Fahrenheit <-> °Celsius

# A) Température fournie en °C :
tempC = 25
# Conversion en °Fahrenheit :
tempF = tempC * 1.8 + 32
# Affichage :
print tempC, "°C =", tempF, "°F"

# B) Température fournie en °F :
tempF = 25
# Conversion en °Celsius :
tempC = (tempF - 32) / 1.8
# Affichage :
print tempF, "°F =", tempC, "°C"
Exercice 5.5 :
>>> a, b = 1, 1				# variante :  a, b = 1., 1
>>> while b<65:
...     print b, a
...     a,b = a*2, b+1
...
Exercice 5.6 :
# Recherche d'un caractčre particulier dans une chaîne
# Chaîne fournie au départ :
ch = "Monty python flying circus"
# Caractčre ŕ rechercher :
cr = "e"
# Recherche proprement dite :
lc = len(ch) # nombre de caractčres ŕ tester
i = 0 # indice du caractčre en cours d'examen
t = 0 # "drapeau" ŕ lever si le caractčre recherché est présent
while i < lc:
if ch[i] == cr:
t = 1
i = i + 1
# Affichage :
print "Le caractčre", cr,
if t == 1:
print "est présent",
else:
print "est inrouvable",
print "dans la chaîne", ch
Exercice 5.8 :
# Insertion d'un caractčre d'espacement dans une chaîne
# Chaîne fournie au départ :
ch = "Gaston"
# Caractčre ŕ insérer :
cr = "*"
# Le nombre de caractčres ŕ insérer est inférieur d'une unité au
# nombre de caractčres de la chaîne. On traitera donc celle-ci ŕ
# partir de son second caractčre (en omettant le premier).
lc = len(ch) # nombre de caractčres total
i = 1 # indice du premier caractčre ŕ examiner (le second, en fait)
nch = ch[0] # nouvelle chaîne ŕ construire (contient déjŕ le premier car.)
while i < lc:
nch = nch + cr + ch[i]
i = i + 1
# Affichage :
print nch
Exercice 5.9 :
# Inversion d'une chaîne de caractčres
# Chaîne fournie au départ :
ch = "zorglub"
lc = len(ch) # nombre de caractčres total
i = lc - 1 # le traitement commencera ŕ partir du dernier caractčre
nch = "" # nouvelle chaîne ŕ construire (vide au départ)
while i >= 0:
nch = nch + ch[i]
i = i - 1
# Affichage :
print nch
Exercice 5.11 :
# Combinaison de deux listes en une seule
# Listes fournies au départ :
t1 = [31,28,31,30,31,30,31,31,30,31,30,31]
t2 = ['Janvier','Février','Mars','Avril','Mai','Juin',
'Juillet','Aoűt','Septembre','Octobre','Novembre','Décembre']
# Nouvelle liste ŕ construire (vide au départ) :
t3 = []
# Boucle de traitement :
i = 0
while i < len(t1):
t3.append(t2[i])
t3.append(t1[i])
i = i + 1
# Affichage :
print t3
Exercice 5.12 :
# Affichage des éléments d'une liste
# Liste fournie au départ :
t2 = ['Janvier','Février','Mars','Avril','Mai','Juin',
'Juillet','Aoűt','Septembre','Octobre','Novembre','Décembre']
# Affichage :
i = 0
while i < len(t2):
print t2[i],
i = i + 1
Exercice 5.13 :
# Recherche du plus grand élément d'une liste
# Liste fournie au départ :
tt = [32, 5, 12, 8, 3, 75, 2, 15]
# Au fur et ŕ mesure du traitement de la liste, on mémorisera dans
# la variable ci-dessous la valeur du plus grand élément déjŕ trouvé :
max = 0
# Examen de tous les éléments :
i = 0
while i < len(tt):
if tt[i] > max:
max = tt[i] # mémorisation d'un nouveau maximum
i = i + 1
# Affichage :
print "Le plus grand élément de cette liste a la valeur", max
Exercice 5.14 :
# Séparation des nombres pairs et impairs

# Liste fournie au départ :
tt = [32, 5, 12, 8, 3, 75, 2, 15]
pairs = []
impairs = []
# Examen de tous les éléments :
i = 0
while i < len(tt):
    if tt[i] % 2 == 0:
        pairs.append(tt[i])
    else:
        impairs.append(tt[i])
    i = i + 1
# Affichage :
print "Nombres pairs :", pairs
print "Nombres impairs :", impairs
Exercice 6.1 :
# Conversion de miles/heure en km/h et m/s
print "Veuillez entrer le nombre de miles parcourus en une heure : ",
ch = raw_input() # en général préférable ŕ input()
mph = float(ch) # conversion de la chaîne entrée en nombre réel
mps = mph * 1609 / 3600 # conversion en mčtres par seconde
kmph = mph * 1.609 # conversion en km/h
# affichage :
print mph, "miles/heure =", kmph, "km/h, ou encore", mps, "m/s"
Exercice 6.2 :
# Périmčtre et Aire d'un triangle quelconque
from math import sqrt
print "Veuillez entrer le côté a : "
a = float(raw_input())
print "Veuillez entrer le côté b : "
b = float(raw_input())
print "Veuillez entrer le côté c : "
c = float(raw_input())
d = (a + b + c)/2 # demi-périmčtre
s = sqrt(d*(d-a)*(d-b)*(d-c)) # aire (suivant formule)
print "Longueur des côtés =", a, b, c
print "Périmčtre =", d*2, "Aire =", s
Exercice 6.4 :
# Entrée d'éléments dans une liste
tt = [] # Liste ŕ compléter (vide au départ)
ch = "start" # valeur quelconque (mais non nulle)
while ch != "":
print "Veuillez entrer une valeur : "
ch = raw_input()
if ch != "":
tt.append(float(ch)) # variante : tt.append(ch)
# affichage de la liste :
print tt
Exercice 6.8 :
# Traitement de nombres entiers compris entre deux limites

print "Veuillez entrer la limite inférieure :",
a = input()
print "Veuillez entrer la limite supérieure :",
b = input()
s = 0                   # somme recherchée (nulle au départ)
# Parcours de la série des nombres compris entre a et b :
n = a                   # nombre en cours de traitement
while n <= b:
    if n % 3 ==0 and n % 5 ==0:      # variante : 'or' au lieu de 'and'
        s = s + n
    n = n + 1

print "La somme recherchée vaut", s
Exercice 6.9 :
# Années bissextiles
print "Veuillez entrer l'année ŕ tester :",
a = input()
if a % 4 != 0:
# a n'est pas divisible par 4 -> année non bissextile
bs = 0
else:
if a % 400 ==0:
# a divisible par 400 -> année bissextile
bs = 1
elif a % 100 ==0:
# a divisible par 100 -> année non bissextile
bs = 0
else:
# autres cas ou a est divisible par 4 -> année bissextile
bs = 1
if bs ==1:
ch = "est"
else:
ch = "n'est pas"
print "L'année", a, ch, "bissextile."
Variante (proposée par Alex Misbah ) :
a=input('entrée une année:')
if (a%4==0) and ((a0!=0) or (a@0==0)):
print a,"est une année bissextile"
else:
print a,"n'est pas une année bissextile"
Exercice 6.11 : Calculs de triangles
from sys import exit # module contenant des fonctions systčme
print """
Veuillez entrer les longueurs des 3 côtés
(en séparant ces valeurs ŕ l'aide de virgules) :"""
a, b, c = input()
# Il n'est possible de construire un triangle que si chaque côté
# a une longueur inférieure ŕ la somme des deux autres :
if a < (b+c) and b < (a+c) and c < (a+b) :
print "Ces trois longueurs déterminent bien un triangle."
else:
print "Il est impossible de construire un tel triangle !"
exit() # ainsi l'on n'ira pas plus loin.
f = 0
if a == b and b == c :
print "Ce triangle est équilatéral."
f = 1
elif a == b or b == c or c == a :
print "Ce triangle est isocčle."
f = 1
if a*a + b*b == c*c or b*b + c*c == a*a or c*c + a*a == b*b :
print "Ce triangle est rectangle."
f = 1
if f == 0 :
print "Ce triangle est quelconque."
Exercice 6.15 :
# Notes de travaux scolaires
notes = [] # liste ŕ construire
n = 2 # valeur positive quelconque pour initier la boucle
while n >= 0 :
print "Entrez la note suivante, s.v.p. : ",
n = float(raw_input()) # conversion de l'entrée en un nombre réel
if n < 0 :
print "OK. Terminé."
else:
notes.append(n) # ajout d'une note ŕ la liste
# Calculs divers sur les notes déjŕ entrées :
# valeurs minimale et maximale + total de toutes les notes.
min = 500 # valeur supérieure ŕ toute note
max, tot, i = 0, 0, 0
nn = len(notes) # nombre de notes déjŕ entrées
while i < nn:
if notes[i] > max:
max = notes[i]
if notes[i] < min:
min = notes[i]
tot = tot + notes[i]
moy = tot/nn
i = i + 1
print nn, "notes entrées. Max =", max, "Min =", min, "Moy =", moy
Exercice 7.3 :
from math import pi

def surfCercle(r):
    "Surface d'un cercle de rayon r"
    return pi * r**2

# test :
print surfCercle(2.5)
Exercice 7.4 :
def volBoite(x1, x2, x3):
    "Volume d'une boîte parallélipipédique"
    return x1 * x2 * x3

# test :
print volBoite(5.2, 7.7, 3.3)
Exercice 7.5 :
def maximum(n1, n2, n3):
    "Renvoie le plus grand de trois nombres"
    if n1 >= n2 and n1 >= n3:
        return n1
    elif n2 >= n1 and n2 >= n3:
        return n2
    else:
        return n3

# test :
print maximum(4.5, 5.7, 3.9)
Exercice 7.9 :
def compteCar(ca, ch):
"Renvoie le nombre de caractčres ca trouvés dans la chaîne ch"
i, tot = 0, 0
while i < len(ch):
if ch[i] == ca:
tot = tot + 1
i = i + 1
return tot
# test :
print compteCar("e","Cette chaîne est un exemple")
Exercice 7.10 :
def indexMax(tt):
    "renvoie l'indice du plus grand élément de la liste tt"
    i, max = 0, 0
    while i < len(tt):
        if tt[i] > max :
            max, imax = tt[i], i
        i = i + 1
    return imax

# test :
serie = [5, 8, 2, 1, 9, 3, 6, 4]
print indexMax(serie)
Exercice 7.11 :
def nomMois(n):
"renvoie le nom du n-ičme mois de l'année"
mois = ['Janvier,', 'Février', 'Mars', 'Avril', 'Mai', 'Juin', 'Juillet',
'Aoűt', 'Septembre', 'Octobre', 'Novembre', 'Décembre']
return mois[n -1] # les indices sont numérotés ŕ partir de zéro
# test :
print nomMois(4)
Exercice 7.14 :
def volBoite(x1 =10, x2 =10, x3 =10):
    "Volume d'une boîte parallélipipédique"
    return x1 * x2 * x3

# test :
print volBoite()
print volBoite(5.2)
print volBoite(5.2, 3)
Exercice 7.15 :
def volBoite(x1 =-1, x2 =-1, x3 =-1):
    "Volume d'une boîte parallélipipédique"
    if x1 == -1 :
        return x1           # aucun argument n'a été fourni
    elif x2 == -1 :
        return x1**3        # un seul argument -> boîte cubique
    elif x3 == -1 :
        return x1*x1*x2     # deux arguments -> boîte prismatique
    else :
        return x1*x2*x3

# test :
print volBoite()
print volBoite(5.2)
print volBoite(5.2, 3)
print volBoite(5.2, 3, 7.4)
Exercice 7.16 :
def changeCar(ch, ca1, ca2, debut =0, fin =-1):
"Remplace tous les caractčres ca1 par des ca2 dans la chaîne ch"
if fin == -1:
fin = len(ch)
nch, i = "", 0 # nch : nouvelle chaîne ŕ construire
while i < len(ch) :
if i >= debut and i <= fin and ch[i] == ca1:
nch = nch + ca2
else :
nch = nch + ch[i]
i = i + 1
return nch
# test :
print changeCar("Ceci est une toute petite phrase", " ", "*")
print changeCar("Ceci est une toute petite phrase", " ", "*", 8, 12)
print changeCar("Ceci est une toute petite phrase", " ", "*", 12)
Exercice 7.17 :
def eleMax(lst, debut =0, fin =-1):
    "renvoie le plus grand élément de la liste lst"
    if fin == -1:
        fin = len(lst)
    max, i = 0, 0
    while i < len(lst):
        if i >= debut and i <= fin and lst[i] > max:
            max = lst[i]
        i = i + 1
    return max

# test :
serie = [9, 3, 6, 1, 7, 5, 4, 8, 2]
print eleMax(serie)
print eleMax(serie, 2)
print eleMax(serie, 2, 5)
Exercice 8.7 :
from Tkinter import *

# Coordonnées X,Y des 5 anneaux :
coord = [[20,30], [120,30], [220, 30], [70,80], [170,80]]
# Couleurs des 5 anneaux :
coul = ["red", "yellow", "blue", "green", "black"]

base = Tk()
can = Canvas(base, width =335, height =200, bg ="white")
can.pack()
bou = Button(base, text ="Quitter", command =base.quit)
bou.pack(side = RIGHT)
# Dessin des 5 anneaux :
i = 0
while i < 5:
    x1, y1 = coord[i][0], coord[i][1]
    can.create_oval(x1, y1, x1+100, y1 +100, width =2, outline =coul[i])
    i = i +1
base.mainloop()
Variante :
from Tkinter import *

# Dessin des 5 anneaux :
def dessineCercle(i):
    x1, y1 = coord[i][0], coord[i][1]
    can.create_oval(x1, y1, x1+100, y1 +100, width =2, outline =coul[i])

def a1():
    dessineCercle(0)

def a2():
    dessineCercle(1)

def a3():
    dessineCercle(2)

def a4():
    dessineCercle(3)

def a5():
    dessineCercle(4)

# Coordonnées X,Y des 5 anneaux :
coord = [[20,30], [120,30], [220, 30], [70,80], [170,80]]
# Couleurs des 5 anneaux :
coul = ["red", "yellow", "blue", "green", "black"]

base = Tk()
can = Canvas(base, width =335, height =200, bg ="white")
can.pack()
bou = Button(base, text ="Quitter", command =base.quit)
bou.pack(side = RIGHT)

# Installation des 5 boutons :
Button(base, text='1', command = a1).pack(side =LEFT)
Button(base, text='2', command = a2).pack(side =LEFT)
Button(base, text='3', command = a3).pack(side =LEFT)
Button(base, text='4', command = a4).pack(side =LEFT)
Button(base, text='5', command = a5).pack(side =LEFT)
base.mainloop()
Exercices 8.9 et 8.10 :
# Dessin d'un damier, avec placement de pions au hasard
from Tkinter import *
from random import randrange # générateur de nombres aléatoires
def damier():
"dessiner dix lignes de carrés avec décalage alterné"
y = 0
while y < 10:
if y % 2 == 0: # une fois sur deux, on
x = 0 # commencera la ligne de
else: # carrés avec un décalage
x = 1 # de la taille d'un carré
ligne_de_carres(x*c, y*c)
y += 1
def ligne_de_carres(x, y):
"dessiner une ligne de carrés, en partant de x, y"
i = 0
while i < 10:
can.create_rectangle(x, y, x+c, y+c, fill='navy')
i += 1
x += c*2 # espacer les carrés
def cercle(x, y, r, coul):
"dessiner un cercle de centre x,y et de rayon r"
can.create_oval(x-r, y-r, x+r, y+r, fill=coul)
def ajouter_pion():
"dessiner un pion au hasard sur le damier"
# tirer au hasard les coordonnées du pion :
x = c/2 + randrange(10) * c
y = c/2 + randrange(10) * c
cercle(x, y, c/3, 'red')
##### Programme principal : ############
# Tâchez de bien "paramétrer" vos programmes, comme nous l'avons
# fait dans ce script. Celui-ci peut en effet tracer des damiers
# de n'importe quelle taille en changeant seulement la valeur
# d'une seule variable, ŕ savoir la dimension des carrés :
c = 30 # taille des carrés
fen = Tk()
can = Canvas(fen, width =c*10, height =c*10, bg ='ivory')
can.pack(side =TOP, padx =5, pady =5)
b1 = Button(fen, text ='damier', command =damier)
b1.pack(side =LEFT, padx =3, pady =3)
b2 = Button(fen, text ='pions', command =ajouter_pion)
b2.pack(side =RIGHT, padx =3, pady =3)
fen.mainloop()#
Exercice 8.12 :
# Simulation du phénomčne de gravitation universelle
from Tkinter import *
from math import sqrt
def distance(x1, y1, x2, y2):
"distance séparant les points x1,y1 et x2,y2"
d = sqrt((x2-x1)**2 + (y2-y1)**2) # théorčme de Pythagore
return d
def forceG(m1, m2, di):
"force de gravitation s'exerçant entre m1 et m2 pour une distance di"
return m1*m2*6.67e-11/di**2 # loi de Newton
def avance(n, gd, hb):
"déplacement de l'astre n, de gauche ŕ droite ou de haut en bas"
global x, y, step
# nouvelles coordonnées :
x[n], y[n] = x[n] +gd, y[n] +hb
# déplacement du dessin dans le canevas :
can.coords(astre[n], x[n]-10, y[n]-10, x[n]+10, y[n]+10)
# calcul de la nouvelle interdistance :
di = distance(x[0], y[0], x[1], y[1])
# conversion de la distance "écran" en distance "astronomique" :
diA = di*1e9 # (1 pixel => 1 million de km)
# calcul de la force de gravitation correspondante :
f = forceG(m1, m2, diA)
# affichage des nouvelles valeurs de distance et force :
valDis.configure(text="Distance = " +str(diA) +" m")
valFor.configure(text="Force = " +str(f) +" N")
# adaptation du "pas" de déplacement en fonction de la distance :
step = di/10
def gauche1():
avance(0, -step, 0)
def droite1():
avance(0, step, 0)
def haut1():
avance(0, 0, -step)
def bas1():
avance(0, 0, step)
def gauche2():
avance(1, -step, 0)
def droite2():
avance (1, step, 0)
def haut2():
avance(1, 0, -step)
def bas2():
avance(1, 0, step)
# Masses des deux astres :
m1 = 6e24 # (valeur de la masse de la terre, en kg)
m2 = 6e24 #
astre = [0]*2 # liste servant ŕ mémoriser les références des dessins
x =[50., 350.] # liste des coord. X de chaque astre (ŕ l'écran)
y =[100., 100.] # liste des coord. Y de chaque astre
step =10 # "pas" de déplacement initial
# Construction de la fenętre :
fen = Tk()
fen.title(' Gravitation universelle suivant Newton')
# Libellés :
valM1 = Label(fen, text="M1 = " +str(m1) +" kg")
valM1.grid(row =1, column =0)
valM2 = Label(fen, text="M2 = " +str(m2) +" kg")
valM2.grid(row =1, column =1)
valDis = Label(fen, text="Distance")
valDis.grid(row =3, column =0)
valFor = Label(fen, text="Force")
valFor.grid(row =3, column =1)
# Canevas avec le dessin des 2 astres:
can = Canvas(fen, bg ="light yellow", width =400, height =200)
can.grid(row =2, column =0, columnspan =2)
astre[0] = can.create_oval(x[0]-10, y[0]-10, x[0]+10, y[0]+10,
fill ="red", width =1)
astre[1] = can.create_oval(x[1]-10, y[1]-10, x[1]+10, y[1]+10,
fill ="blue", width =1)
# 2 groupes de 4 boutons, chacun installé dans un cadre (frame) :
fra1 = Frame(fen)
fra1.grid(row =4, column =0, sticky =W, padx =10)
Button(fra1, text="<-", fg ='red',command =gauche1).pack(side =LEFT)
Button(fra1, text="->", fg ='red', command =droite1).pack(side =LEFT)
Button(fra1, text="^", fg ='red', command =haut1).pack(side =LEFT)
Button(fra1, text="v", fg ='red', command =bas1).pack(side =LEFT)
fra2 = Frame(fen)
fra2.grid(row =4, column =1, sticky =E, padx =10)
Button(fra2, text="<-", fg ='blue', command =gauche2).pack(side =LEFT)
Button(fra2, text="->", fg ='blue', command =droite2).pack(side =LEFT)
Button(fra2, text="^", fg ='blue', command =haut2).pack(side =LEFT)
Button(fra2, text="v", fg ='blue', command =bas2).pack(side =LEFT)
fen.mainloop()
Exercice 8.16 :
# Conversions de températures Fahrenheit <=> Celsius

from Tkinter import *

def convFar(event):
    "valeur de cette température, exprimée en degrés Fahrenheit"
    tF = eval(champTC.get())
    varTF.set(str(tF*1.8 +32))

def convCel(event):
    "valeur de cette température, exprimée en degrés Celsius"
    tC = eval(champTF.get())
    varTC.set(str((tC-32)/1.8))

fen = Tk()
fen.title('Fahrenheit/Celsius')

Label(fen, text='Temp. Celsius :').grid(row =0, column =0)
# "variable Tkinter" associée au champ d'entrée. Cet "objet-variable"
# assure l'interface entre TCL et Python (voir notes, page 165) :
varTC =StringVar()
champTC = Entry(fen, textvariable =varTC)
champTC.bind("<Return>", convFar)
champTC.grid(row =0, column =1)
# Initialisation du contenu de la variable Tkinter :
varTC.set("100.0")

Label(fen, text='Temp. Fahrenheit :').grid(row =1, column =0)
varTF =StringVar()
champTF = Entry(fen, textvariable =varTF)
champTF.bind("<Return>", convCel)
champTF.grid(row =1, column =1)
varTF.set("212.0")

fen.mainloop()
Exercice 8.18 ŕ 8.20 :
# Cercles et courbes de Lissajous
from Tkinter import *
from math import sin, cos
def move():
global ang, x, y
# on mémorise les coord. précédentes avant de calculer les nouvelles :
xp, yp = x, y
# rotation d'un angle de 0.1 radian :
ang = ang +.1
# sinus et cosinus de cet angle => coord. d'un point du cercle trigono.
x, y = sin(ang), cos(ang)
# Variante déterminant une courbe de Lissajous avec f1/f2 = 2/3 :
# x, y = sin(2*ang), cos(3*ang)
# mise ŕ l'échelle (120 = rayon du cercle, (150,150) = centre du canevas)
x, y = x*120 + 150, y*120 + 150
can.coords(balle, x-10, y-10, x+10, y+10)
can.create_line(xp, yp, x, y, fill ="blue")
ang, x, y = 0., 150., 270.
fen = Tk()
fen.title('Courbes de Lissajous')
can = Canvas(fen, width =300, height=300, bg="white")
can.pack()
balle = can.create_oval(x-10, y-10, x+10, y+10, fill='red')
Button(fen, text='Go', command =move).pack()
fen.mainloop()
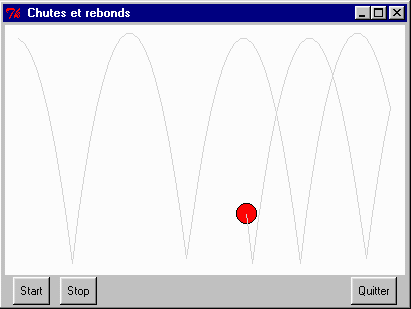
Exercice 8.27 :
# Chutes et rebonds
from Tkinter import *
def move():
global x, y, v, dx, dv, flag
xp, yp = x, y # mémorisation des coord. précédentes
# déplacement horizontal :
if x > 385 or x < 15 : # rebond sur les parois latérales :
dx = -dx # on inverse le déplacement
x = x + dx
# variation de la vitesse verticale (toujours vers le bas):
v = v + dv
# déplacement vertical (proportionnel ŕ la vitesse)
y = y + v
if y > 240: # niveau du sol ŕ 240 pixels :
y = 240 # défense d'aller + loin !
v = -v # rebond : la vitesse s'inverse
# on repositionne la balle :
can.coords(balle, x-10, y-10, x+10, y+10)
# on trace un bout de trajectoire :
can.create_line(xp, yp, x, y, fill ='light grey')
# ... et on remet ça jusqu'ŕ plus soif :
if flag > 0:
fen.after(50,move)
def start():
global flag
flag = flag +1
if flag == 1:
move()
def stop():
global flag
flag =0
# initialisation des coordonnées, des vitesses et du témoin d'animation :
x, y, v, dx, dv, flag = 15, 15, 0, 6, 5, 0
fen = Tk()
fen.title(' Chutes et rebonds')
can = Canvas(fen, width =400, height=250, bg="white")
can.pack()
balle = can.create_oval(x-10, y-10, x+10, y+10, fill='red')
Button(fen, text='Start', command =start).pack(side =LEFT, padx =10)
Button(fen, text='Stop', command =stop).pack(side =LEFT)
Button(fen, text='Quitter', command =fen.quit).pack(side =RIGHT, padx =10)
fen.mainloop()
Exercice 9.1 (éditeur simple, pour lire et écrire dans un fichier 'texte') :
def sansDC(ch):
"cette fonction renvoie la chaîne ch amputée de son dernier caractčre"
nouv = ""
i, j = 0, len(ch) -1
while i < j:
nouv = nouv + ch[i]
i = i + 1
return nouv
def ecrireDansFichier():
of = open(nomF, 'a')
while 1:
ligne = raw_input("entrez une ligne de texte (ou <Enter>) : ")
if ligne == '':
break
else:
of.write(ligne + '\n')
of.close()
def lireDansFichier():
of = open(nomF, 'r')
while 1:
ligne = of.readline()
if ligne == "":
break
# afficher en omettant le dernier caractčre (= fin de ligne) :
print sansDC(ligne)
of.close()
nomF = raw_input('Nom du fichier ŕ traiter : ')
choix = raw_input('Entrez "e" pour écrire, "c" pour consulter les données : ')
if choix =='e':
ecrireDansFichier()
else:
lireDansFichier()
Exercice 9.3 (génération des tables de multiplication de 2 ŕ 30) :
def tableMulti(n):
# Fonction générant la table de multiplication par n (20 termes)
# La table sera renvoyée sous forme d'une chaîne de caractčres :
i, ch = 0, ""
while i < 20:
i = i + 1
ch = ch + str(i * n) + " "
return ch
NomF = raw_input("Nom du fichier ŕ créer : ")
fichier = open(NomF, 'w')
# Génération des tables de 2 ŕ 30 :
table = 2
while table < 31:
fichier.write(tableMulti(table) + '\n')
table = table + 1
fichier.close()
Exercice 9.4 :
# Triplement des espaces dans un fichier texte.
# Ce script montre également comment modifier le contenu d'un fichier
# en le transférant d'abord tout entier dans une liste, puis en
# réenregistrant celle-ci aprčs modifications
def triplerEspaces(ch):
"fonction qui triple les espaces entre mots dans la chaîne ch"
i, nouv = 0, ""
while i < len(ch):
if ch[i] == " ":
nouv = nouv + " "
else:
nouv = nouv + ch[i]
i = i +1
return nouv
NomF = raw_input("Nom du fichier : ")
fichier = open(NomF, 'r+') # 'r+' = mode read/write
lignes = fichier.readlines() # lire toutes les lignes
n=0
while n < len(lignes):
lignes[n] = triplerEspaces(lignes[n])
n =n+1
fichier.seek(0) # retour au début du fichier
fichier.writelines(lignes) # réenregistrement
fichier.close()
Exercice 9.5 :
# Mise en forme de données numériques.
# Le fichier traité est un fichier texte dont chaque ligne contient un nombre
# réel (sans exposants et encodé sous la forme d'une chaîne de caractčres)
def valArrondie(ch):
"représentation arrondie du nombre présenté dans la chaîne ch"
f = float(ch) # conversion de la chaîne en un nombre réel
e = int(f + .5) # conversion en entier (On ajoute d'abord
# 0.5 au réel pour l'arrondir correctement)
return str(e) # reconversion en chaîne de caractčres
fiSource = raw_input("Nom du fichier ŕ traiter : ")
fiDest = raw_input("Nom du fichier destinataire : ")
fs = open(fiSource, 'r')
fd = open(fiDest, 'w')
while 1:
ligne = fs.readline() # lecture d'une ligne du fichier
if ligne == "" or ligne == "\n":
break
ligne = valArrondie(ligne)
fd.write(ligne +"\n")
fd.close()
fs.close()
Exercice 9.6 :
# Comparaison de deux fichiers, caractčre par caractčre :
fich1 = raw_input("Nom du premier fichier : ")
fich2 = raw_input("Nom du second fichier : ")
fi1 = open(fich1, 'r')
fi2 = open(fich2, 'r')
c, f = 0, 0 # compteur de caractčres et "drapeau"
while 1:
c = c + 1
car1 = fi1.read(1) # lecture d'un caractčre dans chacun
car2 = fi2.read(1) # des deux fichiers
if car1 =="" or car2 =="":
break
if car1 != car2 :
f = 1
break # différence trouvée
fi1.close()
fi2.close()
print "Ces 2 fichiers",
if f ==1:
print "diffčrent ŕ partir du caractčre n°", c
else:
print "sont identiques."
Exercice 9.7 :
# Combinaison de deux fichiers texte pour en faire un nouveau
fichA = raw_input("Nom du premier fichier : ")
fichB = raw_input("Nom du second fichier : ")
fichC = raw_input("Nom du fichier destinataire : ")
fiA = open(fichA, 'r')
fiB = open(fichB, 'r')
fiC = open(fichC, 'w')
while 1:
ligneA = fiA.readline()
ligneB = fiB.readline()
if ligneA =="" and ligneB =="":
break # On est arrivé ŕ la fin des 2 fichiers
if ligneA != "":
fiC.write(ligneA)
if ligneB != "":
fiC.write(ligneB)
fiA.close()
fiB.close()
fiC.close()
Exercice 9.8 :
# Enregistrer les coordonnées des membres d'un club
def encodage():
"renvoie la liste des valeurs entrées, ou une liste vide"
print "*** Veuillez entrer les données (ou <Enter> pour terminer) :"
while 1:
nom = raw_input("Nom : ")
if nom == "":
return []
prenom = raw_input("Prénom : ")
rueNum = raw_input("Adresse (N° et rue) : ")
cPost = raw_input("Code postal : ")
local = raw_input("Localité : ")
tel = raw_input("N° de téléphone : ")
print nom, prenom, rueNum, cPost, local, tel
ver = raw_input("Entrez <Enter> si c'est correct, sinon <n> ")
if ver == "":
break
return [nom, prenom, rueNum, cPost, local, tel]
def enregistrer(liste):
"enregistre les données de la liste en les séparant par des <#>"
i = 0
while i < len(liste):
of.write(liste[i] + "#")
i = i + 1
of.write("\n") # caractčre de fin de ligne
nomF = raw_input('Nom du fichier destinataire : ')
of = open(nomF, 'a')
while 1:
tt = encodage()
if tt == []:
break
enregistrer(tt)
of.close()
Exercice 9.9 :
# Ajouter des informations dans le fichier du club
def traduire(ch):
"convertir une ligne du fichier source en liste de données"
dn = "" # chaîne temporaire pour extraire les données
tt = [] # la liste ŕ produire
i = 0
while i < len(ch):
if ch[i] == "#":
tt.append(dn) # on ajoute la donnée ŕ la liste, et
dn ="" # on réinitialise la chaine temporaire
else:
dn = dn + ch[i]
i = i + 1
return tt
def encodage(tt):
"renvoyer la liste tt, complétée avec la date de naissance et le sexe"
print "*** Veuillez entrer les données (ou <Enter> pour terminer) :"
# Affichage des données déjŕ présentes dans la liste :
i = 0
while i < len(tt):
print tt[i],
i = i +1
print
while 1:
daNai = raw_input("Date de naissance : ")
sexe = raw_input("Sexe (m ou f) : ")
print daNai, sexe
ver = raw_input("Entrez <Enter> si c'est correct, sinon <n> ")
if ver == "":
break
tt.append(daNai)
tt.append(sexe)
return tt
def enregistrer(tt):
"enregistrer les données de la liste tt en les séparant par des <#>"
i = 0
while i < len(tt):
fd.write(tt[i] + "#")
i = i + 1
fd.write("\n") # caractčre de fin de ligne
fSource = raw_input('Nom du fichier source : ')
fDest = raw_input('Nom du fichier destinataire : ')
fs = open(fSource, 'r')
fd = open(fDest, 'w')
while 1:
ligne = fs.readline() # lire une ligne du fichier source
if ligne =="" or ligne =="\n":
break
liste = traduire(ligne) # la convertir en une liste
liste = encodage(liste) # y ajouter les données supplémentaires
enregistrer(liste) # sauvegarder dans fichier dest.
fd.close()
fs.close()
Exercice 9.10 :
# Recherche de lignes particuličres dans un fichier texte :
def chercheCP(ch):
"recherche dans ch la portion de chaîne contenant le code postal"
i, f, ns = 0, 0, 0 # ns est un compteur de codes #
cc = "" # chaîne ŕ construire
while i < len(ch):
if ch[i] =="#":
ns = ns +1
if ns ==3: # le CP se trouve aprčs le 3e code #
f = 1 # variable "drapeau" (flag)
elif ns ==4: # inutile de lire aprčs le 4e code #
break
elif f ==1: # le caractčre lu fait partie du
cc = cc + ch[i] # CP recherché -> on mémorise
i = i +1
return cc
nomF = raw_input("Nom du fichier ŕ traiter : ")
codeP = raw_input("Code postal ŕ rechercher : ")
fi = open(nomF, 'r')
while 1:
ligne = fi.readline()
if ligne =="":
break
if chercheCP(ligne) == codeP:
print ligne
fi.close()
Exercice 10.2 (découpage d'une chaîne en fragments) :
def decoupe(ch, n):
"découpage de la chaîne ch en une liste de fragments de n caractčres"
d, f = 0, n # indices de début et de fin de fragment
tt = [] # liste ŕ construire
while d < len(ch):
if f > len(ch): # on ne peut pas découper au-delŕ de la fin
f = len(ch)
fr = ch[d:f] # découpage d'un fragment
tt.append(fr) # ajout du fragment ŕ la liste
d, f = f, f +n # indices suivants
return tt
def inverse(tt):
"rassemble les éléments de la liste tt dans l'ordre inverse"
ch = "" # chaîne ŕ construire
i = len(tt) # on commence par la fin de la liste
while i > 0 :
i = i - 1 # le dernier élément possčde l'indice n -1
ch = ch + tt[i]
return ch
# Test :
ch ="abcdefghijklmnopqrstuvwxyz123456789"
liste = decoupe(ch, 5)
print liste
print inverse(liste)
Exercice 10.3 :
# Rechercher l'indice d'un caractčre dans une chaîne
def trouve(ch, car, deb=0):
"trouve l'indice du caractčre car dans la chaîne ch"
i = deb
while i < len(ch):
if ch[i] == car:
return i # le caractčre est trouvé -> on termine
i = i + 1
return -1 # toute la chaîne a été scannée sans succčs
# Tests :
print trouve("Coucou c'est moi", "z")
print trouve("Juliette & Roméo", "&")
print trouve("César & Cléopâtre", "r", 5)
Exercice 10.6 :
prefixes, suffixe = "JKLMNOP", "ack"

for p in prefixes:
    print p + suffixe
Exercice 10.7 :
def compteMots(ch):
"comptage du nombre de mots dans la chaîne ch"
if len(ch) ==0:
return 0
nm = 1 # la chaîne comporte au moins un mot
for c in ch:
if c == " ": # il suffit de compter les espaces
nm = nm + 1
return nm
# Test :
print compteMots("Les petits ruisseaux font les grandes rivičres")
Exercice 10.8 :
def majuscule(car):
    "renvoie <vrai> si car est une majuscule"
    if car in "ABCDEFGHIJKLMNOPQRSTUVWXYZ":
        return 1
    else:
        return 0
Exercice 10.10 :
def chaineListe(ch):
"convertit la chaîne ch en une liste de mots"
liste, ct = [], "" # ct est une chaîne temporaire
for c in ch:
if c == " ":
liste.append(ct) # ajouter la ch. temporaire ŕ la liste
ct = "" # ré-initialiser la ch. temporaire
else:
ct = ct + c
if ct != "":
liste.append(ct) # ne pas oublier le dernier mot
return liste
# Test :
print chaineListe("Une hirondelle ne fait pas le printemps")
print chaineListe("")
Exercice 10.11 (utilise les deux fonctions définies dans les exercices précédents) :
txt = "Le nom de ce Monsieur est Alphonse"
lst = chaineListe(txt) # convertir la phrase en une liste de mots
for mot in lst: # analyser chacun des mots de la liste
if majuscule(mot[0]): # tester le premier caractčre du mot
print mot
Exercice 10.12 :
def majuscule(car):
"renvoie <vrai> si car est une majuscule"
if car >= "A" and car <= "Z":
return 1
else:
return 0
def minuscule(car):
"renvoie <vrai> si car est une minuscule"
if car >= "a" and car <= "z":
return 1
else:
return 0
def alphab(car):
"renvoie <vrai> si car est un caractčre alphabétique"
if majuscule(car) or minuscule(car):
return 1
else:
return 0
Exercice 10.15 (utilise deux fonctions définies dans les exercices précédents) :
def compteMaj(ch):
"comptage des mots débutant par une majuscule dans la chaîne ch"
c = 0
lst = chaineListe(ch) # convertir la phrase en une liste de mots
for mot in lst: # analyser chacun des mots de la liste
if majuscule(mot[0]): # tester le premier caractčre du mot
c = c +1
return c
# Test :
print compteMaj("Les filles Tidgout se nomment Justine et Corinne")
Exercice 10.16 (table des codes ASCII) :
c = 32 # Premier code ASCII <imprimable>
while c < 128 : # caractčres non accentués seulement
print "Code", c, ":", chr(c), " ",
c = c + 1
Exercice 10.18 (Convertir majuscules -> minuscules et inversément) :
def convMajMin(ch):
"échange les majuscules et les minuscules dans la chaîne ch"
nouvC = "" # chaîne ŕ construire
for car in ch:
code = ord(car)
if car >= "A" and car <= "Z":
code = code + 32
elif car >= "a" and car <= "z":
code = code - 32
nouvC = nouvC + chr(code)
return nouvC
# Test :
print convMajMin("Ferdinand-Charles de CAMARET")
Exercice 10.20 (Comptage de voyelles) :
def voyelle(car):
    "teste si car est une voyelle"
    if car in "AEIOUYaeiouy":
        return 1
    else:
        return 0

def compteVoyelles(ch):
    "compte les voyelles présentes dans la chaîne ch"
    n = 0
    for c in ch:
        if voyelle(c):
            n = n + 1
    return n

# Test :
print compteVoyelles("Monty Python Flying Circus")
Exercice 10.22 :
# Comptage du nombre de mots dans un texte
fiSource = raw_input("Nom du fichier ŕ traiter : ")
fs = open(fiSource, 'r')
n = 0 # variable compteur
while 1:
ch = fs.readline()
if ch == "":
break
# conversion de la chaîne lue en une liste de mots :
li = ch.split()
# totalisation des mots :
n = n + len(li)
fs.close()
print "Ce fichier texte contient un total de %s mots" % (n)
Exercice 10.23 :
# Conversion en majuscule du premier caractčre de chaque ligne
fiSource = raw_input("Nom du fichier ŕ traiter : ")
fiDest = raw_input("Nom du fichier destinataire : ")
fs = open(fiSource, 'r')
fd = open(fiDest, 'w')
while 1:
ch = fs.readline()
if ch == "":
break
if ch[0] >= "A" and ch[0] <= "Z":
# le premier car. est une majuscule. On passe.
pass
else:
# Reconstruction de la chaîne:
pc = ch[0].upper() # Premier caractčre converti
rc = ch[1:] # toute le reste de la chaîne
ch = pc + rc # fusion
# variante utilisant une méthode encore plus intégrée :
# ch = ch.capitalize()
# Transcription :
fd.write(ch)
fd.close()
fs.close()
Exercice 10.24 :
# Fusion de lignes pour former des phrases
fiSource = raw_input("Nom du fichier ŕ traiter : ")
fiDest = raw_input("Nom du fichier destinataire : ")
fs = open(fiSource, 'r')
fd = open(fiDest, 'w')
# On lit d'abord la premičre ligne :
ch1 = fs.readline()
# On lit ensuite les suivantes, en les fusionnant si nécessaire :
while 1:
ch2 = fs.readline()
if ch2 == "":
break
# Si la chaîne lue commence par une majuscule, on transcrit
# la précédente dans le fichier destinataire, et on la
# remplace par celle que l'on vient de lire :
if ch2[0] >= "A" and ch2[0] <= "Z":
fd.write(ch1)
ch1 = ch2
# Sinon, on la fusionne avec la précédente :
else:
ch1 = ch1[:-1] + " " + ch2
# (veiller ŕ enlever de ch1 le caractčre de fin de ligne)
fd.write(ch1) # ne pas oublier de transcrire la derničre !
fd.close()
fs.close()
Exercice 10.25 (caractéristiques de sphčres) :
# Le fichier de départ est un fichier <texte> dont chaque ligne contient
# un nombre réel (encodé sous la forme d'une chaîne de caractčres)
from math import pi
def caractSphere(d):
"renvoie les caractéristiques d'une sphčre de diamčtre d"
d = float(d) # conversion de l'argument (=chaîne) en réel
r = d/2 # rayon
ss = pi*r**2 # surface de section
se = 4*pi*r**2 # surface extérieure
v = 4./3*pi*r**3 # volume (! la 1e division doit ętre réelle !)
# Le marqueur de conversion %8.2f utilisé ci-dessous formate le nombre
# affiché de maničre ŕ occuper 8 caractčres au total, en arrondissant
# de maničre ŕ conserver deux chiffres aprčs la virgule :
ch = "Diam. %6.2f cm Section = %8.2f cm˛ " % (d, ss)
ch = ch +"Surf. = %8.2f cm˛. Vol. = %9.2f cmł" % (se, v)
return ch
fiSource = raw_input("Nom du fichier ŕ traiter : ")
fiDest = raw_input("Nom du fichier destinataire : ")
fs = open(fiSource, 'r')
fd = open(fiDest, 'w')
while 1:
diam = fs.readline()
if diam == "" or diam == "\n":
break
fd.write(caractSphere(diam) + "\n") # enregistrement
fd.close()
fs.close()
Exercice 10.26 :
# Mise en forme de données numériques
# Le fichier traité est un fichier <texte> dont chaque ligne contient un nombre
# réel (sans exposants et encodé sous la forme d'une chaîne de caractčres)
def arrondir(reel):
"représentation arrondie ŕ .0 ou .5 d'un nombre réel"
ent = int(reel) # partie entičre du nombre
fra = reel - ent # partie fractionnaire
if fra < .25 :
fra = 0
elif fra < .75 :
fra = .5
else:
fra = 1
return ent + fra
fiSource = raw_input("Nom du fichier ŕ traiter : ")
fiDest = raw_input("Nom du fichier destinataire : ")
fs = open(fiSource, 'r')
fd = open(fiDest, 'w')
while 1:
ligne = fs.readline()
if ligne == "" or ligne == "\n":
break
n = arrondir(float(ligne)) # conversion en <float>, puis arrondi
fd.write(str(n) + "\n") # enregistrement
fd.close()
fs.close()
Exercice 10.29 :
# Affichage de tables de multiplication
nt = [2, 3, 5, 7, 9, 11, 13, 17, 19]
def tableMulti(m, n):
"renvoie n termes de la table de multiplication par m"
ch =""
for i in range(n):
v = m * (i+1) # calcul d'un des termes
ch = ch + "M" % (v) # formatage ŕ 4 caractčres
return ch
for a in nt:
print tableMulti(a, 15) # 15 premiers termes seulement
Exercice 10.30 (simple parcours d'une liste) :
lst = ['Jean-Michel', 'Marc', 'Vanessa', 'Anne',
'Maximilien', 'Alexandre-Benoît', 'Louise']
for e in lst:
print "%s : %s caractčres" % (e, len(e))
Exercice 10.31 :
# Elimination de doublons
lst = [9, 12, 40, 5, 12, 3, 27, 5, 9, 3, 8, 22, 40, 3, 2, 4, 6, 25]
lst2 = []
for el in lst:
if el not in lst2:
lst2.append(el)
lst2.sort()
print lst2
Exercice 10.33 (afficher tous les jours d'une année) :
## Cette variante utilise une liste de listes ##
## (que l'on pourrait aisément remplacer par deux listes distinctes)
# La liste ci-dessous contient deux éléments qui sont eux-męmes des listes.
# l'élément 0 contient les nombres de jours de chaque mois, tandis que
# l'élément 1 contient les noms des douze mois :
mois = [[31, 28, 31, 30, 31, 30, 31, 31, 30, 31, 30, 31],
['Janvier', 'Février', 'Mars', 'Avril', 'Mai', 'Juin', 'Juillet',
'Aoűt', 'Septembre', 'Octobre', 'Novembre', 'Décembre']]
jour = ['Dimanche','Lundi','Mardi','Mercredi','Jeudi','Vendredi','Samedi']
ja, jm, js, m = 0, 0, 0, 0
while ja <365:
ja, jm = ja +1, jm +1 # ja = jour dans l'année, jm = jour dans le mois
js = (ja +3) % 7 # js = jour de la semaine. Le décalage ajouté
# permet de choisir le jour de départ
if jm > mois[0][m]: # élément m de l'élément 0 de la liste
jm, m = 1, m+1
print jour[js], jm, mois[1][m] # élément m de l'élément 1 de la liste
Exercice 10.36 :
# Insertion de nouveaux éléments dans une liste existante
t1 = [31, 28, 31, 30, 31, 30, 31, 31, 30, 31, 30, 31]
t2 = ['Janvier','Février','Mars','Avril','Mai','Juin',
'Juillet','Aoűt','Septembre','Octobre','Novembre','Décembre']
c, d = 1, 0
while d < 12 :
t2[c:c] = [t1[d]] # ! l'élément inséré doit ętre une liste
c, d = c+2, d+1
Exercice 10.40 :
# Crible d'Eratosthčne pour rechercher les nombres premiers de 1 ŕ 999
# Créer une liste de 1000 éléments 1 (leurs indices vont de 0 ŕ 999) :
lst = [1]*1000
# Parcourir la liste ŕ partir de l'élément d'indice 2:
for i in range(2,1000):
# Mettre ŕ zéro les éléments suivants dans la liste,
# dont les indices sont des multiples de i :
for j in range(i*2, 1000, i):
lst[j] = 0
# Afficher les indices des éléments restés ŕ 1 (on ignore l'élément 0) :
for i in range(1,1000):
if lst[i]:
print i,
Exercice 10.43 (Test du générateur de nombres aléatoires, page 141) :
from random import random # tire au hasard un réel entre 0 et 1
n = raw_input("Nombre de valeurs ŕ tirer au hasard (défaut = 1000) : ")
if n == "":
nVal =1000
else:
nVal = int(n)
n = raw_input("Nombre de fractions dans l'intervalle 0-1 (entre 2 et "
+ str(nVal/10) + ", défaut =5) : ")
if n == "":
nFra =5
else:
nFra = int(n)
if nFra < 2:
nFra =2
elif nFra > nVal/10:
nFra = nVal/10
print "Tirage au sort des", nVal, "valeurs ..."
listVal = [0]*nVal # créer une liste de zéros
for i in range(nVal): # puis modifier chaque élément
listVal[i] = random()
print "Comptage des valeurs dans chacune des", nFra, "fractions ..."
listCompt = [0]*nFra # créer une liste de compteurs
# parcourir la liste des valeurs :
for valeur in listVal:
# trouver l'index de la fraction qui contient la valeur :
index = int(valeur*nFra)
# incrémenter le compteur correspondant :
listCompt[index] = listCompt[index] +1
# afficher l'état des compteurs :
for compt in listCompt:
print compt,
Exercice 10.44 : tirage de cartes
from random import randrange
couleurs = ['Pique', 'Trčfle', 'Carreau', 'Coeur']
valeurs = [2, 3, 4, 5, 6, 7, 8, 9, 10, 'valet', 'dame', 'roi', 'as']
# Construction de la liste des 52 cartes :
carte =[]
for coul in couleurs:
for val in valeurs:
carte.append("%s de %s" % (str(val), coul))
# Tirage au hasard :
while 1:
k = raw_input("Frappez <c> pour tirer une carte, <Enter> pour terminer ")
if k =="":
break
r = randrange(52)
print carte[r]
Exercice 10.45 : Création et consultation d'un dictionnaire
def consultation():
while 1:
nom = raw_input("Entrez le nom (ou <enter> pour terminer) : ")
if nom == "":
break
if dico.has_key(nom): # le nom est-il répertorié ?
item = dico[nom] # consultaion proprement dite
age, taille = item[0], item[1]
print "Nom : %s - âge : %s ans - taille : %s m."\
% (nom, age, taille)
else:
print "*** nom inconnu ! ***"
def remplissage():
while 1:
nom = raw_input("Entrez le nom (ou <enter> pour terminer) : ")
if nom == "":
break
age = int(raw_input("Entrez l'âge (nombre entier !) : "))
taille = float(raw_input("Entrez la taille (en mčtres) : "))
dico[nom] = (age, taille)
dico ={}
while 1:
choix = raw_input("Choisissez : (R)emplir - (C)onsulter - (T)erminer : ")
if choix.upper() == 'T':
break
elif choix.upper() == 'R':
remplissage()
elif choix.upper() == 'C':
consultation()
Exercice 10.46 : échange des clés et des valeurs dans un dictionnaire
def inverse(dico):
"Construction d'un nouveau dico, pas ŕ pas"
dic_inv ={}
for cle in dico:
item = dico[cle]
dic_inv[item] = cle
return dic_inv
# programme test :
dico = {'Computer':'Ordinateur',
'Mouse':'Souris',
'Keyboard':'Clavier',
'Hard disk':'Disque dur',
'Screen':'Ecran'}
print dico
print inverse(dico)
Exercice 10.47 : histogramme
nFich = raw_input('Nom du fichier : ')
fi = open(nFich, 'r')
texte = fi.read() # conversion du fichier en une chaîne de caractčres
fi.close()
print texte
dico ={}
for c in texte:
c = c.upper() # conversion de toutes les lettres en majuscules
dico[c] = dico.get(c, 0) +1
liste = dico.items()
liste.sort()
print liste
Exercice 10.48 :
nFich = raw_input('Nom du fichier ŕ traiter : ')
fi = open(nFich, 'r')
texte = fi.read()
fi.close()
# afin de pouvoir aisément séparer les mots du texte, on commence
# par convertir tous les caractčres non-alphabétiques en espaces :
alpha = "abcdefghijklmnopqrstuvwxyzéčŕůçâęîôűäëďöü"
lettres = '' # nouvelle chaîne ŕ construire
for c in texte:
c = c.lower() # conversion de chaque caractčre en minuscule
if c in alpha:
lettres = lettres + c
else:
lettres = lettres + ' '
# conversion de la chaîne résultante en une liste de mots :
mots = lettres.split()
# construction de l'histogramme :
dico ={}
for m in mots:
dico[m] = dico.get(m, 0) +1
liste = dico.items()
# tri de la liste résultante :
liste.sort()
# affichage en clair :
for item in liste:
print item[0], ":", item[1]
Exercice 10.49 :
# encodage d'un texte dans un dictionnaire
nFich = raw_input('Nom du fichier ŕ traiter : ')
fi = open(nFich, 'r')
texte = fi.read()
fi.close()
# On considčre que les mots sont des suites de caractčres faisant partie
# de la chaîne ci-dessous. Tous les autres sont des séparateurs :
alpha = "abcdefghijklmnopqrstuvwxyzéčŕůçâęîôűäëďöü"
# construction du dictionnaire :
dico ={}
# parcours de tous les caractčres du texte :
i =0 # indice du caractčre en cours de lecture
mot ="" # variable de travail : mot en cours de lecture
for c in texte:
c = c.lower() # conversion de chaque caractčre en minuscule
if c in alpha: # car. alphab. => on est ŕ l'intérieur d'un mot
mot = mot + c
else: # car. non-alphabétique => fin de mot
if mot != "": # afin d'ignorer les car. non-alphab. successifs
# pour chaque mot, on construit une liste d'indices :
if dico.has_key(mot): # mot déjŕ répertorié :
dico[mot].append(i) # ajout d'un indice ŕ la liste
else: # mot rencontré pour la 1e fois :
dico[mot] =[i] # création de la liste d'indices
mot ="" # préparer la lecture du mot suivant
i = i+1 # indice du caractčre suivant
# Affichage du dictionnaire, en clair :
for clef, valeur in dico.items():
print clef, ":", valeur
Exercice 10.50 : Sauvegarde d'un dictionnaire (complément de l'ex. 10.45).
def enregistrement():
fich = raw_input("Entrez le nom du fichier de sauvegarde : ")
ofi = open(fich, "w")
# parcours du dictionnaire entier, converti au préalable en une liste :
for cle, valeur in dico.items():
# utilisation du formatage des chaînes pour créer l'enregistrement :
ofi.write("%s@%s#%s\n" % (cle, valeur[0], valeur[1]))
ofi.close()
def lectureFichier():
fich = raw_input("Entrez le nom du fichier de sauvegarde : ")
try:
ofi = open(fich, "r")
except:
print "*** fichier inexistant ***"
return
while 1:
ligne = ofi.readline()
if ligne =='': # détection de la fin de fichier
break
enreg = ligne.split("@") # restitution d'une liste [clé,valeur]
cle = enreg[0]
valeur = enreg[1][:-1] # élimination du caractčre de fin de ligne
data = valeur.split("#") # restitution d'une liste [âge, taille]
age, taille = int(data[0]), float(data[1])
dico[cle] = (age, taille) # reconstitution du dictionnaire
ofi.close()
Ces deux fonctions peuvent ętre appelées respectivement ŕ la fin et au début du programme principal, comme dans l'exemple ci-dessous :
dico ={}
lectureFichier()
while 1:
    choix = raw_input("Choisissez : (R)emplir - (C)onsulter - (T)erminer : ")
    if choix.upper() == 'T':
        break
    elif choix.upper() == 'R':
        remplissage()
    elif choix.upper() == 'C':
        consultation()
enregistrement()
Exercice 10.51 : Contrôle du flux d'exécution ŕ l'aide d'un dictionnaire
Cet exercice complčte le précédent. On ajoute encore deux petites fonctions, et on réécrit le corps principal du programme pour diriger le flux d'exécution en se servant d'un dictionnaire :
def sortie():
    print "*** Job terminé ***"
    return 1                        # afin de provoquer la sortie de la boucle

def autre():
    print "Veuillez frapper R, A, C, S ou T, svp."


dico ={}
fonc ={"R":lectureFichier, "A":remplissage, "C":consultation,
       "S":enregistrement, "T":sortie}
while 1:
    choix = raw_input("Choisissez :\n" +\
    "(R)écupérer un dictionnaire préexistant sauvegardé dans un fichier\n" +\
    "(A)jouter des données au dictionnaire courant\n" +\
    "(C)onsulter le dictionnaire courant\n" +\
    "(S)auvegarder le dictionnaire courant dans un fichier\n" +\
    "(T)erminer : ")
    # l'instruction ci-dessous appelle une fonction différente pour
    # chaque choix, par l'intermédiaire du dictionnaire <fonc> :
    if fonc.get(choix, autre)():
        break
    # Rem : toutes les fonctions appelées ici renvoient <None> par défaut,
    #       sauf la fonction sortie() qui renvoie 1 => sortie de la boucle
Exercice 12.1 :
class Domino:
    def __init__(self, pa, pb):
        self.pa, self.pb = pa, pb

    def affiche_points(self):
        print "face A :", self.pa,
        print "face B :", self.pb

    def valeur(self):
        return self.pa + self.pb

# Programme de test :

d1 = Domino(2,6)
d2 = Domino(4,3)

d1.affiche_points()
d2.affiche_points()

print "total des points :", d1.valeur() + d2.valeur()

liste_dominos = []
for i in range(7):
    liste_dominos.append(Domino(6, i))

vt =0
for i in range(7):
    liste_dominos[i].affiche_points()
    vt = vt + liste_dominos[i].valeur()

print "valeur totale des points", vt
Exercice 12.3 :
class Voiture:
    def __init__(self, marque = 'Ford', couleur = 'rouge'):
        self.couleur = couleur
        self.marque = marque
        self.pilote = 'personne'
        self.vitesse = 0

    def accelerer(self, taux, duree):
        if self.pilote =='personne':
            print "Cette voiture n'a pas de conducteur !"
        else:
            self.vitesse = self.vitesse + taux * duree

    def choix_conducteur(self, nom):
        self.pilote = nom

    def affiche_tout(self):
            print "%s %s pilotée par %s, vitesse = %s m/s" % \
            (self.marque, self.couleur, self.pilote, self.vitesse)

a1 = Voiture('Peugeot', 'bleue')
a2 = Voiture(couleur = 'verte')
a3 = Voiture('Mercedes')
a1.choix_conducteur('Roméo')
a2.choix_conducteur('Juliette')
a2.accelerer(1.8, 12)
a3.accelerer(1.9, 11)
a2.affiche_tout()
a3.affiche_tout()
Exercice 12.4 :
class Satellite:
    def __init__(self, nom, masse =100, vitesse =0):
        self.nom, self.masse, self.vitesse = nom, masse, vitesse

    def impulsion(self, force, duree):
        self.vitesse = self.vitesse + force * duree / self.masse

    def energie(self):
        return self.masse * self.vitesse**2 / 2

    def affiche_vitesse(self):
        print "Vitesse du satellite %s = %s m/s" \
                          % (self.nom, self.vitesse)

# Programme de test :

s1 = Satellite('Zoé', masse =250, vitesse =10)

s1.impulsion(500, 15)
s1.affiche_vitesse()
print s1.energie()
s1.impulsion(500, 15)
s1.affiche_vitesse()
print s1.energie()
Exercices 12.5-12.6 (classes de cylindres et de cônes) :
# Classes dérivées - polymorphisme

class Cercle:
    def __init__(self, rayon):
        self.rayon = rayon

    def surface(self):
        return 3.1416 * self.rayon**2

class Cylindre(Cercle):
    def __init__(self, rayon, hauteur):
        Cercle.__init__(self, rayon)
        self.hauteur = hauteur

    def volume(self):
        return self.surface()*self.hauteur

        # la méthode surface() est héritée de la classe parente

class Cone(Cylindre):
    def __init__(self, rayon, hauteur):
        Cylindre.__init__(self, rayon, hauteur)

    def volume(self):
        return Cylindre.volume(self)/3

        # cette nouvelle méthode volume() remplace celle que
        # l'on a héritée de la classe parente (exemple de polymorphisme)

cyl = Cylindre(5, 7)
print cyl.surface()
print cyl.volume()

co = Cone(5,7)
print co.surface()
print co.volume()
Exercice 12.7 :
# Tirage de cartes
from random import randrange
class JeuDeCartes:
"""Jeu de cartes"""
# attributs de classe (communs ŕ toutes les instances) :
couleur = ('Pique', 'Trčfle', 'Carreau', 'Coeur')
valeur = (0, 0, 2, 3, 4, 5, 6, 7, 8, 9, 10, 'valet', 'dame', 'roi', 'as')
def __init__(self):
"Construction de la liste des 52 cartes"
self.carte =[]
for coul in range(4):
for val in range(13):
self.carte.append((val +2, coul)) # la valeur commence ŕ 2
def nom_carte(self, c):
"Renvoi du nom de la carte c, en clair"
return "%s de %s" % (self.valeur[c[0]], self.couleur[c[1]])
def battre(self):
"Mélange des cartes"
t = len(self.carte) # nombre de cartes restantes
# pour mélanger, on procčde ŕ un nombre d'échanges équivalent :
for i in range(t):
# tirage au hasard de 2 emplacements dans la liste :
h1, h2 = randrange(t), randrange(t)
# échange des cartes situées ŕ ces emplacements :
self.carte[h1], self.carte[h2] = self.carte[h2], self.carte[h1]
def tirer(self):
"Tirage de la premičre carte de la pile"
t = len(self.carte) # vérifier qu'il reste des cartes
if t >0:
carte = self.carte[0] # choisir la premičre carte du jeu
del(self.carte[0]) # la retirer du jeu
return carte # en renvoyer copie au prog. appelant
else:
return None # facultatif
### Programme test :
if __name__ == '__main__':
jeu = JeuDeCartes() # instanciation d'un objet
jeu.battre() # mélange des cartes
for n in range(53): # tirage des 52 cartes :
c = jeu.tirer()
if c == None: # il ne reste aucune carte
print 'Terminé !' # dans la liste
else:
print jeu.nom_carte(c) # valeur et couleur de la carte
Exercice 12.8 :
(On supposera que l'exercice précédent a été sauvegardé sous le nom cartes.py)
# Bataille de de cartes

from cartes import JeuDeCartes

jeuA = JeuDeCartes()        # instanciation du premier jeu
jeuB = JeuDeCartes()        # instanciation du second jeu
jeuA.battre()               # mélange de chacun
jeuB.battre()
pA, pB = 0, 0               # compteurs de points des joueurs A et B

# tirer 52 fois une carte de chaque jeu :
for n in range(52):
    cA, cB = jeuA.tirer(), jeuB.tirer()
    vA, vB = cA[0], cB[0]   # valeurs de ces cartes
    if vA > vB:
        pA += 1
    elif vB > vA:
        pB += 1             # (rien ne se passe si vA = vB)
    # affichage des points successifs et des cartes tirées :
    print "%s * %s ==> %s * %s" % (jeuA.nom_carte(cA), jeuB.nom_carte(cB), pA, pB)

print "le joueur A obtient %s points, le joueur B en obtient %s." % (pA, pB)
Exercice 13.6 :
from Tkinter import *
def cercle(can, x, y, r, coul ='white'):
"dessin d'un cercle de rayon <r> en <x,y> dans le canevas <can>"
can.create_oval(x-r, y-r, x+r, y+r, fill =coul)
class Application(Tk):
def __init__(self):
Tk.__init__(self) # constructeur de la classe parente
self.can =Canvas(self, width =475, height =130, bg ="white")
self.can.pack(side =TOP, padx =5, pady =5)
Button(self, text ="Train", command =self.dessine).pack(side =LEFT)
Button(self, text ="Hello", command =self.coucou).pack(side =LEFT)
Button(self, text ="Ecl34", command =self.eclai34).pack(side =LEFT)
def dessine(self):
"instanciation de 4 wagons dans le canevas"
self.w1 = Wagon(self.can, 10, 30)
self.w2 = Wagon(self.can, 130, 30, 'dark green')
self.w3 = Wagon(self.can, 250, 30, 'maroon')
self.w4 = Wagon(self.can, 370, 30, 'purple')
def coucou(self):
"apparition de personnages dans certaines fenętres"
self.w1.perso(3) # 1er wagon, 3e fenętre
self.w3.perso(1) # 3e wagon, 1e fenętre
self.w3.perso(2) # 3e wagon, 2e fenętre
self.w4.perso(1) # 4e wagon, 1e fenętre
def eclai34(self):
"allumage de l'éclairage dans les wagons 3 & 4"
self.w3.allumer()
self.w4.allumer()
class Wagon:
def __init__(self, canev, x, y, coul ='navy'):
"dessin d'un petit wagon en <x,y> dans le canevas <canev>"
# mémorisation des paramčtres dans des variables d'instance :
self.canev, self.x, self.y = canev, x, y
# rectangle de base : 95x60 pixels :
canev.create_rectangle(x, y, x+95, y+60, fill =coul)
# 3 fenętres de 25x40 pixels, écartées de 5 pixels :
self.fen =[] # pour mémoriser les réf. des fenętres
for xf in range(x +5, x +90, 30):
self.fen.append(canev.create_rectangle(xf, y+5,
xf+25, y+40, fill ='black'))
# 2 roues de rayon égal ŕ 12 pixels :
cercle(canev, x+18, y+73, 12, 'gray')
cercle(canev, x+77, y+73, 12, 'gray')
def perso(self, fen):
"apparition d'un petit personnage ŕ la fenętre <fen>"
# calcul des coordonnées du centre de chaque fenętre :
xf = self.x + fen*30 -12
yf = self.y + 25
cercle(self.canev, xf, yf, 10, "pink") # visage
cercle(self.canev, xf-5, yf-3, 2) # oeil gauche
cercle(self.canev, xf+5, yf-3, 2) # oeil droit
cercle(self.canev, xf, yf+5, 3) # bouche
def allumer(self):
"déclencher l'éclairage interne du wagon"
for f in self.fen:
self.canev.itemconfigure(f, fill ='yellow')
Application().app.mainloop()
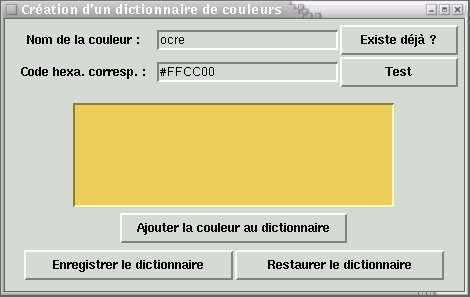
Exercice 13.21 :
# Dictionnaire de couleurs
from Tkinter import *
# Module donnant accčs aux boîtes de dialogue standard pour
# la recherche de fichiers sur disque :
from tkFileDialog import asksaveasfile, askopenfile
class Application(Frame):
'''Fenętre d'application'''
def __init__(self):
Frame.__init__(self)
self.master.title("Création d'un dictionnaire de couleurs")
self.dico ={} # création du dictionnaire
# Les widgets sont regroupés dans deux cadres (Frames) :
frSup =Frame(self) # cadre supérieur contenant 6 widgets
Label(frSup, text ="Nom de la couleur :",
width =20).grid(row =1, column =1)
self.enNom =Entry(frSup, width =25) # champ d'entrée pour
self.enNom.grid(row =1, column =2) # le nom de la couleur
Button(frSup, text ="Existe déjŕ ?", width =12,
command =self.chercheCoul).grid(row =1, column =3)
Label(frSup, text ="Code hexa. corresp. :",
width =20).grid(row =2, column =1)
self.enCode =Entry(frSup, width =25) # champ d'entrée pour
self.enCode.grid(row =2, column =2) # le code hexa.
Button(frSup, text ="Test", width =12,
command =self.testeCoul).grid(row =2, column =3)
frSup.pack(padx =5, pady =5)
frInf =Frame(self) # cadre inférieur contenant le reste
self.test = Label(frInf, bg ="white", width =45, # zone de test
height =7, relief = SUNKEN)
self.test.pack(pady =5)
Button(frInf, text ="Ajouter la couleur au dictionnaire",
command =self.ajouteCoul).pack()
Button(frInf, text ="Enregistrer le dictionnaire", width =25,
command =self.enregistre).pack(side = LEFT, pady =5)
Button(frInf, text ="Restaurer le dictionnaire", width =25,
command =self.restaure).pack(side =RIGHT, pady =5)
frInf.pack(padx =5, pady =5)
self.pack()
def ajouteCoul(self):
"ajouter la couleur présente au dictionnaire"
if self.testeCoul() ==0: # une couleur a-t-elle été définie ?
return
nom = self.enNom.get()
if len(nom) >1: # refuser les noms trop petits
self.dico[nom] =self.cHexa
else:
self.test.config(text ="%s : nom incorrect" % nom, bg ='white')
def chercheCoul(self):
"rechercher une couleur déjŕ inscrite au dictionnaire"
nom = self.enNom.get()
if self.dico.has_key(nom):
self.test.config(bg =self.dico[nom], text ="")
else:
self.test.config(text ="%s : couleur inconnue" % nom, bg ='white')
def testeCoul(self):
"vérifier la validité d'un code hexa. - afficher la couleur corresp."
try:
self.cHexa =self.enCode.get()
self.test.config(bg =self.cHexa, text ="")
return 1
except:
self.test.config(text ="Codage de couleur incorrect", bg ='white')
return 0
def enregistre(self):
"enregistrer le dictionnaire dans un fichier texte"
# Cette méthode utilise une boîte de dialogue standard pour la
# sélection d'un fichier sur disque. Tkinter fournit toute une série
# de fonctions associées ŕ ces boîtes, dans le module tkFileDialog.
# La fonction ci-dessous renvoie un objet-fichier ouvert en écriture :
ofi =asksaveasfile(filetypes=[("Texte",".txt"),("Tous","*")])
for clef, valeur in self.dico.items():
ofi.write("%s %s\n" % (clef, valeur))
ofi.close()
def restaure(self):
"restaurer le dictionnaire ŕ partir d'un fichier de mémorisation"
# La fonction ci-dessous renvoie un objet-fichier ouvert en lecture :
ofi =askopenfile(filetypes=[("Texte",".txt"),("Tous","*")])
lignes = ofi.readlines()
for li in lignes:
cv = li.split() # extraction de la clé et la valeur corresp.
self.dico[cv[0]] = cv[1]
ofi.close()
if __name__ == '__main__':
Application().mainloop()
Exercice 13.22 (variante 3) :
from Tkinter import *
from random import randrange
from math import sin, cos, pi
class FaceDom:
def __init__(self, can, val, pos, taille =70):
self.can =can
x, y, c = pos[0], pos[1], taille/2
self. carre = can.create_rectangle(x -c, y-c, x+c, y+c,
fill ='ivory', width =2)
d = taille/3
# disposition des points sur la face, pour chacun des 6 cas :
self.pDispo = [((0,0),),
((-d,d),(d,-d)),
((-d,-d), (0,0), (d,d)),
((-d,-d),(-d,d),(d,-d),(d,d)),
((-d,-d),(-d,d),(d,-d),(d,d),(0,0)),
((-d,-d),(-d,d),(d,-d),(d,d),(d,0),(-d,0))]
self.x, self.y, self.dim = x, y, taille/15
self.pList =[] # liste contenant les points de cette face
self.tracer_points(val)
def tracer_points(self, val):
# créer les dessins de points correspondant ŕ la valeur val :
disp = self.pDispo[val -1]
for p in disp:
self.cercle(self.x +p[0], self.y +p[1], self.dim, 'red')
self.val = val
def cercle(self, x, y, r, coul):
self.pList.append(self.can.create_oval(x-r, y-r, x+r, y+r, fill=coul))
def effacer(self, flag =0):
for p in self.pList:
self.can.delete(p)
if flag:
self.can.delete(self.carre)
class Projet(Frame):
def __init__(self, larg, haut):
Frame.__init__(self)
self.larg, self.haut = larg, haut
self.can = Canvas(self, bg='dark green', width =larg, height =haut)
self.can.pack(padx =5, pady =5)
# liste des boutons ŕ installer, avec leur gestionnaire :
bList = [("A", self.boutA), ("B", self.boutB),
("C", self.boutC), ("Quitter", self.boutQuit)]
bList.reverse() # inverser l'ordre de la liste
for b in bList:
Button(self, text =b[0], command =b[1]).pack(side =RIGHT, padx=3)
self.pack()
self.des =[] # liste qui contiendra les faces de dés
self.actu =0 # réf. du dé actuellement sélectionné
def boutA(self):
if len(self.des):
return # car les dessins existent déjŕ !
a, da = 0, 2*pi/13
for i in range(13):
cx, cy = self.larg/2, self.haut/2
x = cx + cx*0.75*sin(a) # pour disposer en cercle,
y = cy + cy*0.75*cos(a) # on utilise la trigono !
self.des.append(FaceDom(self.can, randrange(1,7) , (x,y), 65))
a += da
def boutB(self):
# incrémenter la valeur du dé sélectionné. Passer au suivant :
v = self.des[self.actu].val
v = v % 6
v += 1
self.des[self.actu].effacer()
self.des[self.actu].tracer_points(v)
self.actu += 1
self.actu = self.actu % 13
def boutC(self):
for i in range(len(self.des)):
self.des[i].effacer(1)
self.des =[]
self.actu =0
def boutQuit(self):
self.master.destroy()
Projet(600, 600).mainloop()
Exercice 16.1 (Création de la base de données "musique") :
import gadfly
connex = gadfly.gadfly()
connex.startup("musique","E:/Python/essais/gadfly")
cur = connex.cursor()
requete = "create table compositeurs (comp varchar, a_naiss integer,\
a_mort integer)"
cur.execute(requete)
requete = "create table oeuvres (comp varchar, titre varchar,\
duree integer, interpr varchar)"
cur.execute(requete)
print "Entrée des enregistrements, table des compositeurs :"
while 1:
nm = raw_input("Nom du compositeur (<Enter> pour terminer) : ")
if nm =='':
break
an = raw_input("Année de naissance : ")
am = raw_input("Année de mort : ")
requete ="insert into compositeurs(comp, a_naiss, a_mort) values \
('%s', %s, %s)" % (nm, an, am)
cur.execute(requete)
# Affichage des données entrées, pour vérification :
cur.execute("select * from compositeurs")
print cur.pp()
print "Entrée des enregistrements, table des oeuvres musicales :"
while 1:
nom = raw_input("Nom du compositeur (<Enter> pour terminer) : ")
if nom =='':
break
tit = raw_input("Titre de l'oeuvre : ")
dur = raw_input("durée (minutes) : ")
int = raw_input("interprčte principal : ")
requete ="insert into oeuvres(comp, titre, duree, interpr) values \
('%s', '%s', %s, '%s')" % (nom, tit, dur, int)
cur.execute(requete)
# Affichage des données entrées, pour vérification :
cur.execute("select * from oeuvres")
print cur.pp()
connex.commit()
Exercice 18.2 :
#####################################
# Bombardement d'une cible mobile #
# (C) G. Swinnen - Avril 2004 - GPL #
#####################################
from Tkinter import *
from math import sin, cos, pi
from random import randrange
from threading import Thread
class Canon:
"""Petit canon graphique"""
def __init__(self, boss, num, x, y, sens):
self.boss = boss # référence du canevas
self.num = num # n° du canon dans la liste
self.x1, self.y1 = x, y # axe de rotation du canon
self.sens = sens # sens de tir (-1:gauche, +1:droite)
self.lbu = 30 # longueur de la buse
# dessiner la buse du canon (horizontale) :
self.x2, self.y2 = x + self.lbu * sens, y
self.buse = boss.create_line(self.x1, self.y1,
self.x2, self.y2, width =10)
# dessiner le corps du canon (cercle de couleur) :
self.rc = 15 # rayon du cercle
self.corps = boss.create_oval(x -self.rc, y -self.rc, x +self.rc,
y +self.rc, fill ='black')
# pré-dessiner un obus (au départ c'est un simple point) :
self.obus = boss.create_oval(x, y, x, y, fill='red')
self.anim = 0
# retrouver la largeur et la hauteur du canevas :
self.xMax = int(boss.cget('width'))
self.yMax = int(boss.cget('height'))
def orienter(self, angle):
"régler la hausse du canon"
# rem : le paramčtre <angle> est reçu en tant que chaîne.
# il faut donc le traduire en réel, puis le convertir en radians :
self.angle = float(angle)*2*pi/360
self.x2 = self.x1 + self.lbu * cos(self.angle) * self.sens
self.y2 = self.y1 - self.lbu * sin(self.angle)
self.boss.coords(self.buse, self.x1, self.y1, self.x2, self.y2)
def feu(self):
"déclencher le tir d'un obus"
# référence de l'objet cible :
self.cible = self.boss.master.cible
if self.anim ==0:
self.anim =1
# position de départ de l'obus (c'est la bouche du canon) :
self.xo, self.yo = self.x2, self.y2
v = 20 # vitesse initiale
# composantes verticale et horizontale de cette vitesse :
self.vy = -v *sin(self.angle)
self.vx = v *cos(self.angle) *self.sens
self.animer_obus()
def animer_obus(self):
"animer l'obus (trajectoire balistique)"
# positionner l'obus, en re-définissant ses coordonnées :
self.boss.coords(self.obus, self.xo -3, self.yo -3,
self.xo +3, self.yo +3)
if self.anim >0:
# calculer la position suivante :
self.xo += self.vx
self.yo += self.vy
self.vy += .5
self.test_obstacle() # a-t-on atteint un obstacle ?
self.boss.after(1, self.animer_obus)
else:
# fin de l'animation :
self.boss.coords(self.obus, self.x1, self.y1, self.x1, self.y1)
def test_obstacle(self):
"évaluer si l'obus a atteint une cible ou les limites du jeu"
if self.yo >self.yMax or self.xo <0 or self.xo >self.xMax:
self.anim =0
return
if self.yo > self.cible.y -3 and self.yo < self.cible.y +18 \
and self.xo > self.cible.x -3 and self.xo < self.cible.x +43:
# dessiner l'explosion de l'obus (cercle orange) :
self.explo = self.boss.create_oval(self.xo -10,
self.yo -10, self.xo +10, self.yo +10,
fill ='orange', width =0)
self.boss.after(150, self.fin_explosion)
self.anim =0
def fin_explosion(self):
"effacer le cercle d'explosion - gérer le score"
self.boss.delete(self.explo)
# signaler le succčs ŕ la fenętre maîtresse :
self.boss.master.goal()
class Pupitre(Frame):
"""Pupitre de pointage associé ŕ un canon"""
def __init__(self, boss, canon):
Frame.__init__(self, bd =3, relief =GROOVE)
self.score =0
s =Scale(self, from_ =88, to =65,
troughcolor ='dark grey',
command =canon.orienter)
s.set(45) # angle initial de tir
s.pack(side =LEFT)
Label(self, text ='Hausse').pack(side =TOP, anchor =W, pady =5)
Button(self, text ='Feu !', command =canon.feu).\
pack(side =BOTTOM, padx =5, pady =5)
Label(self, text ="points").pack()
self.points =Label(self, text=' 0 ', bg ='white')
self.points.pack()
# positionner ŕ gauche ou ŕ droite suivant le sens du canon :
gd =(LEFT, RIGHT)[canon.sens == -1]
self.pack(padx =3, pady =5, side =gd)
def attribuerPoint(self, p):
"incrémenter ou décrémenter le score"
self.score += p
self.points.config(text = ' %s ' % self.score)
class Cible:
"""objet graphique servant de cible"""
def __init__(self, can, x, y):
self.can = can # référence du canevas
self.x, self.y = x, y
self.cible = can.create_oval(x, y, x+40, y+15, fill ='purple')
def deplacer(self, dx, dy):
"effectuer avec la cible un déplacement dx,dy"
self.can.move(self.cible, dx, dy)
self.x += dx
self.y += dy
return self.x, self.y
class Thread_cible(Thread):
"""objet thread gérant l'animation de la cible"""
def __init__(self, app, cible):
Thread.__init__(self)
self.cible = cible # objet ŕ déplacer
self.app = app # réf. de la fenętre d'application
self.sx, self.sy = 6, 3 # incréments d'espace et de
self.dt =300 # temps pour l'animation (ms)
def run(self):
"animation, tant que la fenętre d'application existe"
x, y = self.cible.deplacer(self.sx, self.sy)
if x > self.app.xm -50 or x < self.app.xm /5:
self.sx = -self.sx
if y < self.app.ym /2 or y > self.app.ym -20:
self.sy = -self.sy
if self.app != None:
self.app.after(int(self.dt), self.run)
def stop(self):
"fermer le thread si la fenętre d'application est refermée"
self.app =None
def accelere(self):
"accélérer le mouvement"
self.dt /= 1.5
class Application(Frame):
def __init__(self):
Frame.__init__(self)
self.master.title('<<< Tir sur cible mobile >>>')
self.pack()
self.xm, self.ym = 600, 500
self.jeu = Canvas(self, width =self.xm, height =self.ym,
bg ='ivory', bd =3, relief =SUNKEN)
self.jeu.pack(padx =4, pady =4, side =TOP)
# Instanciation d'un canon et d'un pupitre de pointage :
x, y = 30, self.ym -20
self.gun =Canon(self.jeu, 1, x, y, 1)
self.pup =Pupitre(self, self.gun)
# instanciation de la cible mobile :
self.cible = Cible(self.jeu, self.xm/2, self.ym -25)
# animation de la cible mobile, sur son propre thread :
self.tc = Thread_cible(self, self.cible)
self.tc.start()
# arręter tous les threads lorsque l'on ferme la fenętre :
self.bind('<Destroy>',self.fermer_threads)
def goal(self):
"la cible a été touchée"
self.pup.attribuerPoint(1)
self.tc.accelere()
def fermer_threads(self, evt):
"arręter le thread d'animation de la cible"
self.tc.stop()
if __name__ =='__main__':
Application().mainloop()
19.10. Annexes extraites de « How to think like a computer scientist »▲
Suivant les termes de la GNU Free Documentation licence (voir p. 361), les annexes qui suivent doivent obligatoirement accompagner telles quelles toute distribution du texte original, que celui-ci ait été modifié (traduit, par exemple) ou non.
19.10.1. Contributor list▲
by Jeffrey Elkner
Perhaps the most exciting thing about a free content textbook is the possibility it creates for those using
the book to collaborate in its development. I have been delighted by the many responses, suggestions,
corrections, and words of encouragement I have received from people who have found this book to be
useful, and who have taken the time to let me know about it.
Unfortunately, as a busy high school teacher who is working on this project in my spare time (what little
there is of it ;-), I have been neglectful in giving credit to those who have helped with the book. I always
planned to add an "Acknowlegdements" sections upon completion of the first stable version of the book, but
as time went on it became increasingly difficult to even track those who had contributed.
Upon seeing the most recent version of Tony Kuphaldt's wonderful free text, "Lessons in Electric
Circuits", I got the idea from him to create an ongoing "Contributor List" page which could be easily
modified to include contributors as they come in.
My only regret is that many earlier contributors might be left out. I will begin as soon as possible to go
back through old emails to search out the many wonderful folks who have helped me in this endeavour. In
the mean time, if you find yourself missing from this list, please accept my humble apologies and drop me
an email at jeff@elkner.net to let me know about my oversight.
And so, without further delay, here is a listing of the contributors:
Lloyd Hugh Allen
Lloyd sent in a correction to section 8.4. He can be reached at: lha2@columbia.edu
Yvon Boulianne
Yvon sent in a correction of a logical error in Chapter 5. She can be reached at: mystic@monuniverse.net
Fred Bremmer
Fred submitted a correction in section 2.1. He can be reached at: Fred.Bremmer@ubc.cu
Jonah Cohen
Jonah wrote the Perl scripts to convert the LaTeX source for this book into beautiful HTML. His Web
page is jonah.ticalc.org and his email is JonahCohen@aol.com
Michael Conlon
Michael sent in a grammer correction in Chapter 2 and an improvement in style in Chapter 1, and he
initiated discussion on the technical aspects of interpreters. Michael can be reached at:
michael.conlon@sru.edu
Courtney Gleason
Courtney and Katherine Smith created the first version of horsebet.py, which is used as the case study for
the last chapters of the book. Courtney can be reached at: orion1558@aol.com
Lee Harr
Lee submitted corrections for sections 10.1 and 11.5. He can be reached at: missive@linuxfreemail.com
James Kaylin
James is a student using the text. He has submitted numerous corrections. James can be reached by email
at: Jamarf@aol.com
David Kershaw
David fixed the broken catTwice function in section 3.10. He can be reached at:
david_kershaw@merck.com
Eddie Lam
Eddie has sent in numerous corrections to Chapters 1, 2, and 3. He also fixed the Makefile so that it
creates an index the first time it is run and helped us set up a versioning scheme. Eddie can be reached at:
nautilus@yoyo.cc.monash.edu.au
Man-Yong Lee
Man-Yong sent in a correction to the example code in section 2.4. He can be reaced at:
yong@linuxkorea.co.kr
David Mayo
While he didn't mean to hit us over the head with it, David Mayo pointed out that the word
"unconsciously" in chapter 1 needed to be changed to "subconsciously". David can be reached at:
bdbear44@netscape.net
Chris McAloon
Chris sent in several corrections to sections 3.9 and 3.10. He can be reached at: cmcaloon@ou.edu
Matthew J. Moelter
Matthew has been a long-time contributor who sent in numerous corrections and suggestions to the book.
He can be reached at: mmoelter@calpoly.edu
Simon Dicon Montford
Simon reported a missing function definition and several typos in Chapter 3. He also found errors in the
increment function in Chapter 13. He can be reached at: dicon@bigfoot.com
John Ouzts
John sent in a correction to the "return value" definition in Chapter 3. He can be reached at:
jouzts@bigfoot.com
Kevin Parks
Kevin sent in valuable comments and suggestions as to how to improve the distribution of the book. He
can be reached at: cpsoct@lycos.com
David Pool
David sent in a typo in the glossary of chapter 1, as well as kind words of encouragement. He can be
reached at: pooldavid@hotmail.com
Michael Schmitt
Michael sent in a correction to the chapter on files and exceptions. He can be reached at:
ipv6_128@yahoo.com
Paul Sleigh
Paul found an error in Chapter 7 and a bug in Jonah Cohen's Perl script that generates HTML from
LaTeX. He can be reached at: bat@atdot.dotat.org
Christopher Smith
Chris is a computer science teacher at the Blake School in Minnesota who teaches Python to his
beginning students. He can be reached at: csmith@blakeschool.org or smiles@saysomething.com
Katherine Smith
Katherine and Courtney Gleason created the first version of horsebet.py, which is used as the case study
for the last chapters of the book. Katherine can be reached at: kss_0326@yahoo.com
Craig T. Snydal
Craig is testing the text in a course at Drew University. He has contributed several valuable suggestions
and corrections, and can be reached at: csnydal@drew.edu
Ian Thomas
Ian and his students are using the text in a programming course. They are the first ones to test the
chapters in the latter half of the book, and they have make numerous corrections and suggestions. Ian can be
reached at: ithomas@sd70.bc.ca
Keith Verheyden
Keith made correction in Section 3.11 and can be reached at: kverheyd@glam.ac.uk
Chris Wrobel
Chris made corrections to the code in the chapter on file I/O and exceptions. He can be reached at:
ferz980@yahoo.com
Moshe Zadka
Moshe has made invaluable contributions to this project. In addition to writing the first draft of the
chapter on Dictionaries, he provided continual guidance in the early stages of the book. He can be reached
at: moshez@math.huji.ac.il
19.10.2. Preface▲
by J. Elkner
This book owes its existance to the collaboration made possible by the internet and the free software
movement. Its three authors, a college professor, a high school teacher, and a professional programmer, have
yet to meet face to face, but we have been able to work closely together, and have been aided by many
wonderful folks who have donated their time and energy to helping make it better.
What excites me most about it is that it is a testament to both the benefits and future possibilities of this
kind of collaboration, the framework for which has been put in place by Richard Stallman and the Free
Software Foundation.
a) How and why I came to use Python
In 1999, the College Board's Advanced Placement Computer Science exam was given in C++ for the first
time. As in many high schools throughout the country, the decision to change languages had a direct impact
on the computer science curriculum where I teach at Yorktown High School, in Arlington, Virginia. Up to
this point, Pascal was the language of instruction in both our first year and AP courses. In keeping with past
practice of giving students two years of exposure to the same language, we made the decision to switch to
C++ in the first year course for the 1997-98 school year, so that we would be in step with the College
Board's change for the AP course the following year.
Two years later, I was convinced that C++ was a poor choice to use for introducing students to computer
science. While it is certainly a very powerful programming language, it is also an extremely difficult
language to learn and teach. I found myself constantly fighting with C++'s difficult syntax and multiple
ways of doing things, and I was losing many students unnecessarily as a result. Convinced there had to be a
better language choice for our first year class, I went looking for an alternative to C++.
A discussion on the High School Linux Users' Group mailing list provided a solution. A thread emerged
during the latter part of January, 1999 concerning the best programming language for use with first time
high school computer science students. In a posting on January 30th, Brendon Ranking wrote:
I believe that Python is the best choice for any entry-level programming class. It teaches proper
programming principles while being incredibly easy to learn. It is also designed to be object oriented from
its inception so it doesn't have the add-on pain that both Perl and C++ suffer from...... It is also *very*
widely supported and very much web-centric, as well.
I had first heard of Python a few years earlier at a Linux Install Fest, when an enthusiastic Michael
McLay told me about Python's many merits. He and Brendon had now convinced me that I needed to look
into Python.
Matt Ahrens, one of Yorktown's gifted students, jumped at the chance to try out Python, and in the final
two months of the 1998-99 school year he not only learned the language but wrote an application called
pyTicket which enabled our staff to report technology problems via the web. I knew that Matt could not
have finished an application of that scale in so short a time in C++, and this accomplishment combined with
Matt's positive assessment of Python suggested Python was the solution I was looking for.
b) Finding a text book
Having decided to use Python in both my introductory computer science classes the following year, the
most pressing problem was the lack of an available text book.
Free content came to the rescue. Earlier in the year Richard Stallman had introduced me to Allen
Downey. Both of us had written to Richard expressing an interest in developing free educational content.
Allen had already written a first year computer science text book titled, How to think like a computer
scientist. When I read this book I knew immediately that I wanted to use it in my class. It was the clearest
and most helpful computer science text I had seen. It emphasized the processes of thought involved in
programming, rather than the features of a particular language. Reading it immediately made me a better
teacher.
Not only was How to think like a computer scientist an excellent book, but it was also released under a
GNU public license, which meant it could be used freely and modified to meet the needs of its user. Once I
decided to use Python, it occurred to me that I could translate Allen's original Java version into the new
language. While I would not have been able to write a text book on my own, having Allen's book to work
from made it possible for me to do so, at the same time demonstrating that the cooperative development
model used so well in software could also work for educational content.
Working on this book for the last two years has been rewarding for both me and my students, and the
students played a big part in the process. Since I could make instant changes whenever someone found a
spelling error or difficult passage, I encouraged them to look for errors in the book by giving them a bonus
point every time they found or suggested something that resulted in a change in the text. This had the double
benefit of encouraging them to read the text more carefully, and of getting the text thoroughly reviewed by
its most important critics, students using it to learn computer science.
For the second half of the book on object oriented programming, I knew that someone with more real
programming experience than I had would be needed to do it right. The book actually sat in an unfinished
state for the better part of a year until two things happened that led to its completion.
I received an email from Chris Meyers expressing interest in the book. Chris is a professional
programmer who started teaching a programming course last year using Python at Lane Community College
in Eugene Oregon. The prospect of teaching the course had led Chris to the book, and he started helping out
with it immediately. By the end of the school year he had created a companion project on our web site at
http://www.ibiblio.org/obp called Python for Fun and was working with some of my most advanced students
as a master teacher, guiding them beyond the places I could take them.
c) Introducing programming with Python
The process of translating and using How to think like a computer scientist for the past two years has
confirmed Python's suitability to teaching beginning students. Python greatly simplifies programming
examples and makes important programming ideas easier to teach.
The first example from the text dramatically illustrates this point. It is the traditional "hello, world"
program, which in the C++ version of the book looks like this:
#include <iostream.h>
void main()
{
cout << "Hello, world." << endl;
}
in the Python version it becomes:
print "Hello, World!"
Even though this is a trivial example, the advantages to Python stand out. There are no prerequisites to
Yorktown's Computer Science I course, so many of the students seeing this example are looking at their first
program. Some of them are undoubtedly a little nervous, having heard that computer programming is
difficult to learn. The C++ version has always forced me to choose between two unsatisfying options: either
to explain the #include, void main(), {, and } statements, and risk confusing or intimidating some of the
students right at the start, or to tell them "just don't worry about all of that stuff now, we will talk about it
later" and risk the same thing. The educational objectives at this point in the course are to introduce students
to the idea of a programming statement and to get them to make their first program, thereby introducing
them to the programming environment. The Python program has exactly what is needed to do these things,
and nothing more.
Comparing Section 1.5 of each version of the book, where this first program is located, further illustrates
what this means to the beginning student. There are thirteen paragraphs of explanation of "Hello, world" in
the C++ version, in the Python version there are only two. More importantly, the missing eleven paragraphs
do not deal with the "big ideas" in computer programming, but with the minutia of C++ syntax. I found this
same thing happening throughout the book. Whole paragraphs simply disappear from the Python version of
the text because Python's much clearer syntax renders them unnecessary.
Using a very high level language like Python allows a teacher to postpone talking about low level details
of the machine until students have the background that they need to better make sense of the details. It thus
creates the ability to put "first things first" pedagogically.
One of the best examples of this is the way in which Python handles variables. In C++ a variable is a
name for a place which holds a thing. Variables have to be declared with types at least in part because the
size of the place to which they refer needs to be predetermined. Thus the idea of a variable is bound up with
the hardware of the machine. The powerful and fundamental concept of a variable is already difficult enough
for beginning students (in both Computer Science and Algebra). Bytes and addresses do not help the matter.
In Python a variable is a name which refers to a thing. This is a far more intuitive concept for beginning
students, and one which is much closer to the meaning of variable that they learned in their math class. I had
much less difficulty teaching variables this year than I did in the past, and I spent less time helping students
with problems using them.
Another example of how Python aides in the teaching and learning of programming is in its syntax for
functions. My students have always had a great deal of difficulty understanding functions. The main
problem centers around the difference between a function definition and a function call, and the related
distinction between a parameter and an argument. Python comes to the rescue with syntax that is nothing
short of beautiful. Function definitions begin with the key word def, so I simply tell my students, "when you
define a function, begin with def, followed by the name of the function that you are defining, when you call
a function, simply call (type) out its name." Parameters go with definitions, arguments go with calls. There
are no return types or parameter types or reference and value parameters to get in the way, so I am now able
to teach functions in less then half the time that it previously took me, with better comprehension.
Using Python has improved the effectiveness of our computer science program for all students. I see a
higher general level of success and a lower level of frustration than I experienced during the two years using
C++. I move faster with better results. More students leave the course with the ability to create meaningful
programs, and with the positive attitude toward the experience of programming that this engenders.
d) Building a community
I have received email every continent on the globe and from as far away as Korea from people using this
book to learn or to teach programming. A user community has begun to emerge and increasing numbers of
people have been contributing to the project by sending in materials for the companion web site at
http://www.ibiblio.org/obp.
With the publication of the book in print form, I expect the growth in the user community to continue and
accelerate. It is the emergence of this user community and the possibility it suggests for similar collaboration
among educators that has been the most exciting thing for me about working on the project. By working
together we can both increase the quality of materials available for our use and save valuable time. I invite
you to join our community and look forward to hearing from you.
Jeffrey Elkner
Yorktown High School
Arlington, Virginia
19.10.3. GNU Free Documentation License▲
Version 1.1, March 2000
Copyright © 2000 Free Software Foundation, Inc.
59 Temple Place, Suite 330, Boston, MA 02111-1307 USA
Everyone is permitted to copy and distribute verbatim copies of this license document, but changing it is not
allowed.
Preamble
The purpose of this License is to make a manual, textbook, or other written document "free" in the sense
of freedom: to assure everyone the effective freedom to copy and redistribute it, with or without modifying
it, either commercially or noncommercially. Secondarily, this License preserves for the author and publisher
a way to get credit for their work, while not being considered responsible for modifications made by others.
This License is a kind of "copyleft," which means that derivative works of the document must themselves
be free in the same sense. It complements the GNU General Public License, which is a copyleft license
designed for free software.
We have designed this License in order to use it for manuals for free software, because free software
needs free documentation: a free program should come with manuals providing the same freedoms that the
software does. But this License is not limited to software manuals; it can be used for any textual work,
regardless of subject matter or whether it is published as a printed book. We recommend this License
principally for works whose purpose is instruction or reference.
19.10.3.a.1. Applicability and Definitions▲
This License applies to any manual or other work that contains a notice placed by the copyright holder
saying it can be distributed under the terms of this License. The "Document," below, refers to any such
manual or work. Any member of the public is a licensee, and is addressed as "you."
A "Modified Version" of the Document means any work containing the Document or a portion of it,
either copied verbatim, or with modifications and/or translated into another language.
A "Secondary Section" is a named appendix or a front-matter section of the Document that deals
exclusively with the relationship of the publishers or authors of the Document to the Document's overall
subject (or to related matters) and contains nothing that could fall directly within that overall subject. (For
example, if the Document is in part a textbook of mathematics, a Secondary Section may not explain any
mathematics.) The relationship could be a matter of historical connection with the subject or with related
matters, or of legal, commercial, philosophical, ethical, or political position regarding them.
The "Invariant Sections" are certain Secondary Sections whose titles are designated, as being those of
Invariant Sections, in the notice that says that the Document is released under this License.
The "Cover Texts" are certain short passages of text that are listed, as Front-Cover Texts or Back-Cover
Texts, in the notice that says that the Document is released under this License.
A "Transparent" copy of the Document means a machine-readable copy, represented in a format whose
specification is available to the general public, whose contents can be viewed and edited directly and
straightforwardly with generic text editors or (for images composed of pixels) generic paint programs or (for
drawings) some widely available drawing editor, and that is suitable for input to text formatters or for
automatic translation to a variety of formats suitable for input to text formatters. A copy made in an
otherwise Transparent file format whose markup has been designed to thwart or discourage subsequent
modification by readers is not Transparent. A copy that is not "Transparent" is called "Opaque."
Examples of suitable formats for Transparent copies include plain ASCII without markup, Texinfo input
format, \LaTeX~input format, SGML or XML using a publicly available DTD, and standard-conforming
simple HTML designed for human modification. Opaque formats include PostScript, PDF, proprietary
formats that can be read and edited only by proprietary word processors, SGML or XML for which the DTD
and/or processing tools are not generally available, and the machine-generated HTML produced by some
word processors for output purposes only.
The "Title Page" means, for a printed book, the title page itself, plus such following pages as are needed
to hold, legibly, the material this License requires to appear in the title page. For works in formats which do
not have any title page as such, "Title Page" means the text near the most prominent appearance of the
work's title, preceding the beginning of the body of the text.
19.10.3.a.2. Verbatim Copying▲
You may copy and distribute the Document in any medium, either commercially or noncommercially,
provided that this License, the copyright notices, and the license notice saying this License applies to the
Document are reproduced in all copies, and that you add no other conditions whatsoever to those of this
License. You may not use technical measures to obstruct or control the reading or further copying of the
copies you make or distribute. However, you may accept compensation in exchange for copies. If you
distribute a large enough number of copies you must also follow the conditions in Section 3.
You may also lend copies, under the same conditions stated above, and you may publicly display copies.
19.10.3.a.3. Copying in Quantity▲
If you publish printed copies of the Document numbering more than 100, and the Document's license
notice requires Cover Texts, you must enclose the copies in covers that carry, clearly and legibly, all these
Cover Texts: Front-Cover Texts on the front cover, and Back-Cover Texts on the back cover. Both covers
must also clearly and legibly identify you as the publisher of these copies. The front cover must present the
full title with all words of the title equally prominent and visible. You may add other material on the covers
in addition. Copying with changes limited to the covers, as long as they preserve the title of the Document
and satisfy these conditions, can be treated as verbatim copying in other respects.
If the required texts for either cover are too voluminous to fit legibly, you should put the first ones listed
(as many as fit reasonably) on the actual cover, and continue the rest onto adjacent pages.
If you publish or distribute Opaque copies of the Document numbering more than 100, you must either
include a machine-readable Transparent copy along with each Opaque copy, or state in or with each Opaque
copy a publicly accessible computer-network location containing a complete Transparent copy of the
Document, free of added material, which the general network-using public has access to download
anonymously at no charge using public-standard network protocols. If you use the latter option, you must
take reasonably prudent steps, when you begin distribution of Opaque copies in quantity, to ensure that this
Transparent copy will remain thus accessible at the stated location until at least one year after the last time
you distribute an Opaque copy (directly or through your agents or retailers) of that edition to the public.
It is requested, but not required, that you contact the authors of the Document well before redistributing
any large number of copies, to give them a chance to provide you with an updated version of the Document.
19.10.3.a.4. Modifications▲
You may copy and distribute a Modified Version of the Document under the conditions of Sections 2 and 3 above, provided that you release the Modified Version under precisely this License, with the Modified Version filling the role of the Document, thus licensing distribution and modification of the Modified Version to whoever possesses a copy of it. In addition, you must do these things in the Modified Version:
- Use in the Title Page (and on the covers, if any) a title distinct from that of the Document, and from those
of previous versions (which should, if there were any, be listed in the History section of the Document).
You may use the same title as a previous version if the original publisher of that version gives
permission.
- List on the Title Page, as authors, one or more persons or entities responsible for authorship of the
modifications in the Modified Version, together with at least five of the principal authors of the
Document (all of its principal authors, if it has less than five).
- State on the Title page the name of the publisher of the Modified Version, as the publisher.
- Preserve all the copyright notices of the Document.
- Add an appropriate copyright notice for your modifications adjacent to the other copyright notices.
- Include, immediately after the copyright notices, a license notice giving the public permission to use the
Modified Version under the terms of this License, in the form shown in the Addendum below.
- Preserve in that license notice the full lists of Invariant Sections and required Cover Texts given in the
Document's license notice.
- Include an unaltered copy of this License.
- Preserve the section entitled "History," and its title, and add to it an item stating at least the title, year,
new authors, and publisher of the Modified Version as given on the Title Page. If there is no section
entitled "History" in the Document, create one stating the title, year, authors, and publisher of the
Document as given on its Title Page, then add an item describing the Modified Version as stated in the
previous sentence.
- Preserve the network location, if any, given in the Document for public access to a Transparent copy of
the Document, and likewise the network locations given in the Document for previous versions it was
based on. These may be placed in the "History" section. You may omit a network location for a work that
was published at least four years before the Document itself, or if the original publisher of the version it
refers to gives permission.
- In any section entitled "Acknowledgements" or "Dedications," preserve the section's title, and preserve in
the section all the substance and tone of each of the contributor acknowledgements and/or dedications
given therein.
- Preserve all the Invariant Sections of the Document, unaltered in their text and in their titles. Section
numbers or the equivalent are not considered part of the section titles.
- Delete any section entitled "Endorsements." Such a section may not be included in the Modified Version.
- Do not retitle any existing section as "Endorsements" or to conflict in title with any Invariant Section.
If the Modified Version includes new front-matter sections or appendices that qualify as Secondary
Sections and contain no material copied from the Document, you may at your option designate some or all
of these sections as invariant. To do this, add their titles to the list of Invariant Sections in the Modified
Version's license notice. These titles must be distinct from any other section titles.
You may add a section entitled "Endorsements," provided it contains nothing but endorsements of your
Modified Version by various parties---for example, statements of peer review or that the text has been
approved by an organization as the authoritative definition of a standard.
You may add a passage of up to five words as a Front-Cover Text, and a passage of up to 25 words as a
Back-Cover Text, to the end of the list of Cover Texts in the Modified Version. Only one passage of Front-
Cover Text and one of Back-Cover Text may be added by (or through arrangements made by) any one
entity. If the Document already includes a cover text for the same cover, previously added by you or by
arrangement made by the same entity you are acting on behalf of, you may not add another; but you may
replace the old one, on explicit permission from the previous publisher that added the old one.
The author(s) and publisher(s) of the Document do not by this License give permission to use their names
for publicity for or to assert or imply endorsement of any Modified Version.
19.10.3.a.5. Combining Documents▲
You may combine the Document with other documents released under this License, under the terms
defined in Section 4 above for modified versions, provided that you include in the combination all of the
Invariant Sections of all of the original documents, unmodified, and list them all as Invariant Sections of
your combined work in its license notice.
The combined work need only contain one copy of this License, and multiple identical Invariant Sections
may be replaced with a single copy. If there are multiple Invariant Sections with the same name but different
contents, make the title of each such section unique by adding at the end of it, in parentheses, the name of
the original author or publisher of that section if known, or else a unique number. Make the same adjustment
to the section titles in the list of Invariant Sections in the license notice of the combined work.
In the combination, you must combine any sections entitled "History" in the various original documents,
forming one section entitled "History"; likewise combine any sections entitled "Acknowledgements," and
any sections entitled "Dedications." You must delete all sections entitled "Endorsements."
19.10.3.a.6. Collections of Documents▲
You may make a collection consisting of the Document and other documents released under this License,
and replace the individual copies of this License in the various documents with a single copy that is included
in the collection, provided that you follow the rules of this License for verbatim copying of each of the
documents in all other respects.
You may extract a single document from such a collection, and distribute it individually under this
License, provided you insert a copy of this License into the extracted document, and follow this License in
all other respects regarding verbatim copying of that document.
19.10.3.a.7. Aggregation with Independent Works▲
A compilation of the Document or its derivatives with other separate and independent documents or
works, in or on a volume of a storage or distribution medium, does not as a whole count as a Modified
Version of the Document, provided no compilation copyright is claimed for the compilation. Such a
compilation is called an "aggregate," and this License does not apply to the other self-contained works thus
compiled with the Document, on account of their being thus compiled, if they are not themselves derivative
works of the Document.
If the Cover Text requirement of Section 3 is applicable to these copies of the Document, then if the
Document is less than one quarter of the entire aggregate, the Document's Cover Texts may be placed on
covers that surround only the Document within the aggregate. Otherwise they must appear on covers around
the whole aggregate.
19.10.3.a.8. Translation▲
Translation is considered a kind of modification, so you may distribute translations of the Document under the terms of Section 4. Replacing Invariant Sections with translations requires special permission from their copyright holders, but you may include translations of some or all Invariant Sections in addition to the original versions of these Invariant Sections. You may include a translation of this License provided that you also include the original English version of this License. In case of a disagreement between the translation and the original English version of this License, the original English version will prevail.s
19.10.3.a.9. Termination▲
You may not copy, modify, sublicense, or distribute the Document except as expressly provided for under this License. Any other attempt to copy, modify, sublicense, or distribute the Document is void, and will automatically terminate your rights under this License. However, parties who have received copies, or rights, from you under this License will not have their licenses terminated so long as such parties remain in full compliance.
19.10.3.a.10. Future Revisions of This License▲
The Free Software Foundation may publish new, revised versions of the GNU Free Documentation
License from time to time. Such new versions will be similar in spirit to the present version, but may differ
in detail to address new problems or concerns. See
http:///www.gnu.org/copyleft/.
Each version of the License is given a distinguishing version number. If the Document specifies that a
particular numbered version of this License "or any later version" applies to it, you have the option of
following the terms and conditions either of that specified version or of any later version that has been
published (not as a draft) by the Free Software Foundation. If the Document does not specify a version
number of this License, you may choose any version ever published (not as a draft) by the Free Software
Foundation.
